
Fluffy Strawberry-Packed Biscuits Recipe: Morning Joy
Sweet summer mornings bloom with delectable strawberry biscuits that melt in your mouth with pure bliss.
Southern kitchens have long celebrated these tender, buttery delights studded with ruby-red fruit.
Fresh strawberries infuse each golden biscuit with natural sweetness and vibrant color.
The combination of soft dough and juicy berries creates a symphonic balance of textures and flavors.
Warm from the oven, these biscuits promise a delightful breakfast or afternoon treat that sparks joy with every bite.
The aroma of freshly baked biscuits will draw everyone to the kitchen, eager to savor this irresistible morning delight.
Dive into this simple recipe and transform your ordinary morning into an extraordinary culinary experience.
Quick Recipe Overview
Ingredients for Fluffy Strawberry Biscuits
For Dry Ingredients:For Wet Ingredients:For Filling and Topping:Baking Tool for Mixing and Cutting Dough
How to Bake Sweet Berry Biscuits

Gather essential ingredients for a delightful strawberry-filled treat. Ensure your kitchen workspace is clean and organized with all necessary baking tools nearby.
Combine flour with key raising agents, creating a smooth powdery mixture that will give your biscuits incredible texture and lightness.
Work cold butter into the flour mixture using fingertips or a pastry tool. Break butter into tiny pieces, creating a crumbly landscape that promises flaky results.
Gently introduce buttermilk, transforming the crumbly mixture into a soft, cohesive dough. Handle with care to maintain delicate texture.
Roll out dough on a lightly floured surface, cutting perfect circular biscuits. Transfer carefully to a prepared baking sheet, ensuring even spacing.
Prepare fresh strawberries by adding a hint of sweetness and bright citrus notes. Allow berries to develop rich, juicy flavors while biscuits bake.
Whip cream until soft peaks emerge, folding in subtle sweetness. Create a light, airy complement that will elevate the entire dessert experience.
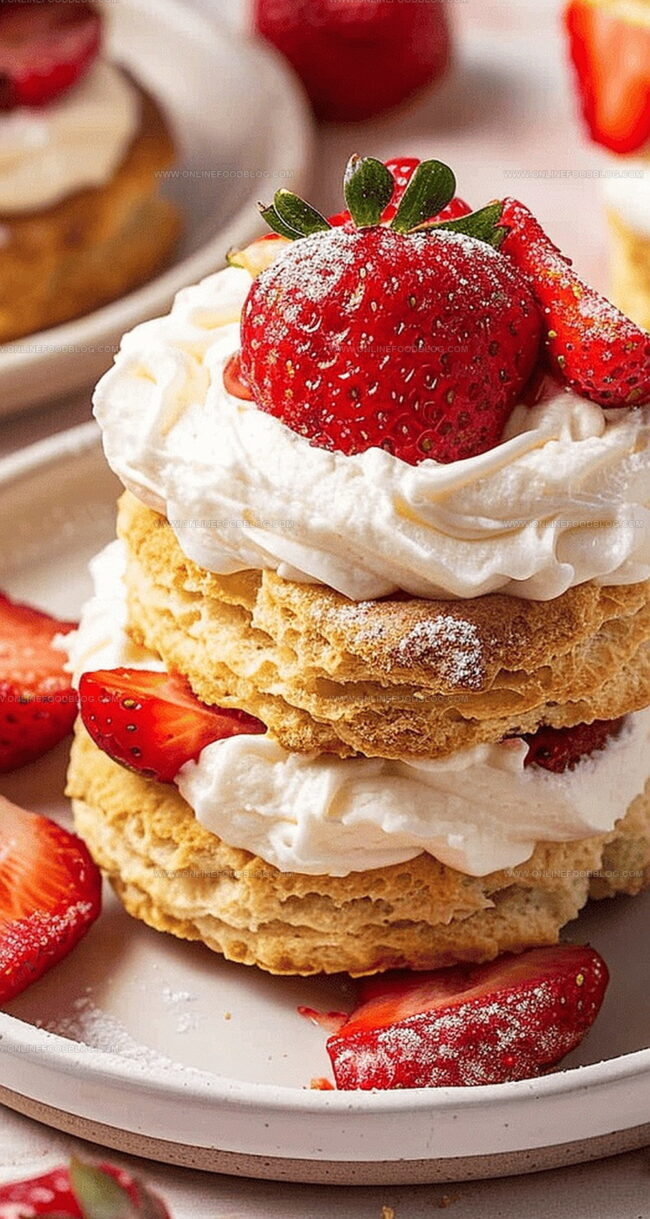
Split warm biscuits, generously layer with whipped cream and macerated strawberries. Serve immediately for maximum deliciousness.
Variations for Fruits, Glaze, or Jam
Serving Strawberry Biscuits Warm or Cold
Storing for Freshness the Next Day
Print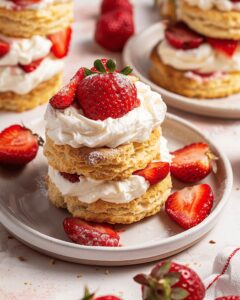
Sweet Strawberry Biscuits
- Total Time: 30 minutes
- Yield: 9 1x
Description
Sweet strawberry biscuits bring Southern charm to dessert tables with buttery, crumbly texture. Pastry chefs and home bakers can quickly master this delightful recipe that delights everyone at the table.
Ingredients
- 1 cup chopped fresh strawberries
- ½ cup buttermilk (plus extra if needed)
- 4 tbsps unsalted butter, chilled
- 160 grams (1 ⅓ cup) all-purpose flour
- 1 ½ tsps baking powder
- ½ cup heavy whipping cream (very cold)
- 1 tbsp granulated sugar
- ¼ tsp salt
- 1 tsp fresh lemon juice
- 1 pinch of salt
- 1 tbsp powdered sugar
- 1/8 tsp baking soda
- ½ tsp vanilla extract
Instructions
- Preparation: Ignite the oven to 450°F and line a quarter sheet pan with parchment paper, ensuring an even baking surface.
- Dry Blend: Whisk flour, salt, baking soda, and baking powder in a mixing bowl until uniformly distributed.
- Butter Integration: Crumble chilled butter into the flour mixture using a pastry cutter, working until the texture resembles coarse sandy granules.
- Dough Formation: Pour buttermilk into the mixture, gently folding and minimally kneading until a cohesive dough develops.
- Shaping: Roll the dough onto a floured surface, softly manipulating 3-4 times and flattening to a precise 1-inch thickness; cut circular shapes with a floured 3-inch biscuit cutter.
- Baking: Position biscuits on the prepared sheet with slight spacing and roast for 9-10 minutes until achieving a golden-bronze complexion.
- Strawberry Preparation: Marinate fresh strawberries with sugar, salt, and lemon juice, allowing natural juices to emerge.
- Cream Elevation: Whip cold cream in a chilled bowl, incorporating powdered sugar and vanilla until achieving a cloudlike consistency.
- Serving: Bisect warm biscuits horizontally, generously adorning with whipped cream and macerated strawberry mixture.
Notes
- Butter Temperature Matters: Use extremely cold butter and work quickly to ensure flaky, tender biscuits with rich, layered texture.
- Mixing Technique: Avoid overworking the dough to prevent tough biscuits; gentle folding keeps the texture light and delicate.
- Cut Straight Down: When using the biscuit cutter, press straight down without twisting to help biscuits rise evenly and maintain a perfect shape.
- Serve Immediately: Enjoy biscuits warm for the best taste and texture, as they lose their crisp exterior and softness when cooled completely.
- Prep Time: 20 minutes
- Cook Time: 10 minutes
- Category: Breakfast, Snacks, Desserts
- Method: Baking
- Cuisine: American
Nutrition
- Serving Size: 9
- Calories: 210
- Sugar: 4 g
- Sodium: 150 mg
- Fat: 12 g
- Saturated Fat: 7 g
- Unsaturated Fat: 4 g
- Trans Fat: 0 g
- Carbohydrates: 24 g
- Fiber: 1 g
- Protein: 3 g
- Cholesterol: 35 mg
Mia Reynolds
Food Writer & Home Cooking Specialist
Expertise
Easy Home Baking, Recipe Writing and Storytelling, Local and Seasonal Ingredients, Baking for Beginners
Education
New England Culinary Institute (NECI), Montpelier, Vermont
Community College of Vermont, Winooski, Vermont
Mia Reynolds fell in love with baking as a teenager experimenting in her family kitchen. Her passion took her to New England Culinary Institute, where she learned practical pastry techniques, and later to Community College of Vermont to deepen her understanding of food management.
Mia combines clear, simple baking instructions with heartwarming stories, making home baking approachable for everyone.