
Dreamy Chocolate Peanut Butter Cheesecake Recipe
Decadent and rich, this chocolate peanut butter cheesecake recipe promises a symphony of indulgent flavors that dance across your palate.
Creamy layers of smooth peanut butter meld perfectly with deep chocolate notes, creating a dessert that’s both luxurious and irresistible.
The velvety texture promises a melt-in-your-mouth experience that will leave you wanting more.
Each slice boasts a delicate balance of sweet and nutty undertones that complement the classic cheesecake base.
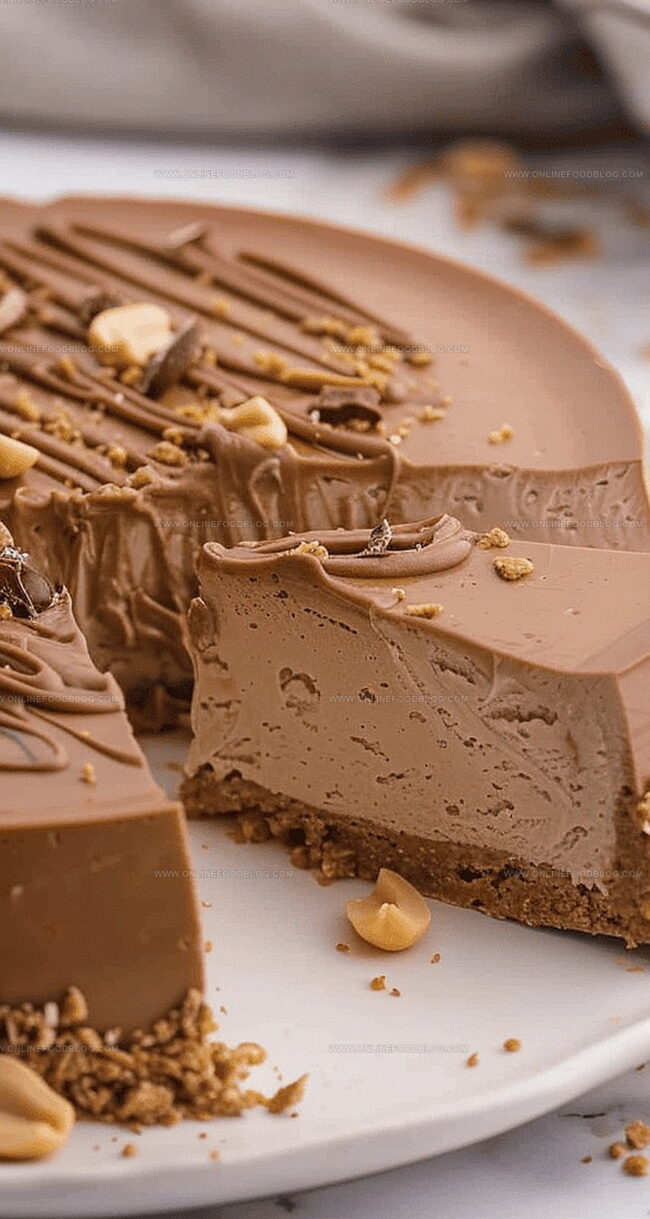
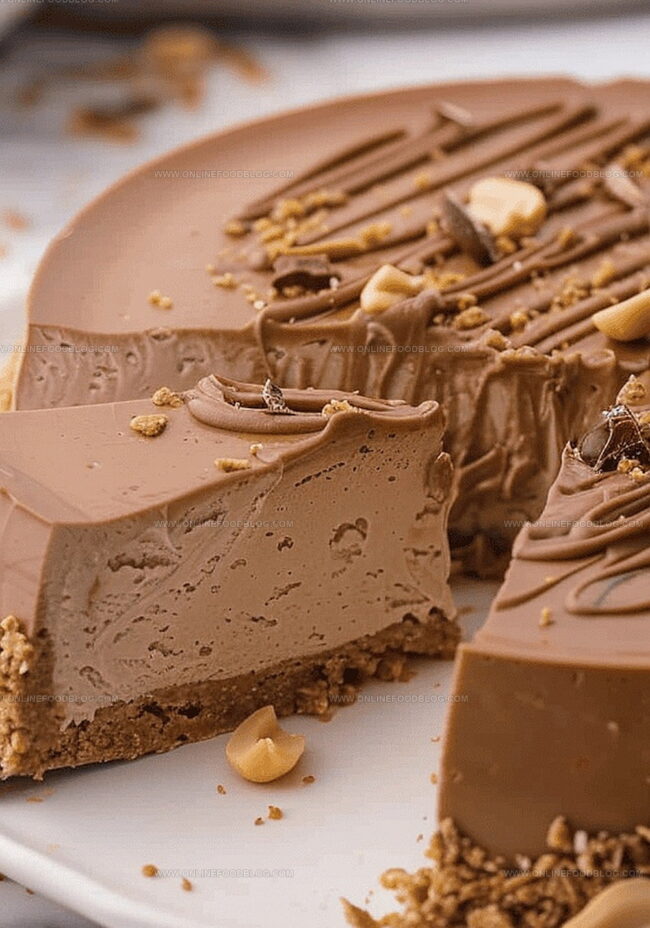
The graham cracker crust adds a delightful crunch, providing a stunning contrast to the silky filling.
chocolate and peanut butter lovers will swoon over this decadent treat that elevates dessert to an art form.
Grab a fork and get ready to savor every single blissful bite of this show-stopping cheesecake.
Quick Recipe Overview
Ingredients for Chocolate Peanut Butter Cheesecake
For Crust Base:For Creamy Filling:For Garnish and Finishing:Baking Equipment for Cheesecake Prep
How to Bake Peanut Butter Cheesecake Layers
Crush pretzels into fine crumbs and blend with melted butter. Press mixture firmly into a springform pan lined with parchment paper, creating a solid foundation for the cheesecake.
Gently melt chocolate with cream in short microwave bursts, stirring carefully to create a smooth chocolate mixture. Let cool slightly before incorporating into the cheesecake batter.
Whip cream cheese until silky smooth, then incorporate sugar, peanut butter, and vanilla. Mix thoroughly until the batter becomes light and fluffy. Fold in the melted chocolate, creating a marbled effect.
Whip remaining cream until it forms stiff peaks. Gently fold into the cheesecake mixture, creating an airy and luxurious texture.
Transfer the cheesecake to the refrigerator and allow it to set for at least 8 hours or overnight. This crucial step ensures the perfect creamy consistency.
Melt additional chocolate with cream for a glossy drizzle. Once cooled, artfully drizzle over the cheesecake. Sprinkle with chopped peanuts and pretzel pieces for added crunch and visual appeal.
Keep the cheesecake refrigerated for up to a week or freeze for 2-3 months. Thaw in the refrigerator before serving or enjoy partially frozen for a refreshing summer dessert.
Flavor Twists & Swirl Tips for Cheesecake
Serving Cheesecake Without the Fuss
Best Way to Chill and Store This Dessert
Print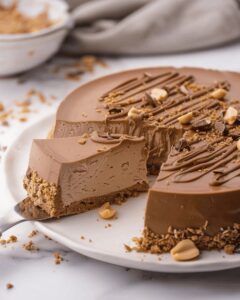
Smooth Chocolate Peanut Butter Cheesecake Recipe
- Total Time: 8 hours 20 minutes
- Yield: 13 1x
Description
Rich chocolate peanut butter cheesecake delivers creamy indulgence with a perfect balance of nutty and sweet flavors. Dessert enthusiasts will savor each luxurious bite of this irresistible classic.
Ingredients
- 3 packages cream cheese (250 grams or 8 oz each)
- 150 grams chopped chocolate
- 1.75 cups powdered icing sugar
- 0.25 cup smooth peanut butter
- 1.5 cups heavy whipping cream (divided)
- 2 cups pretzel crumbs
- 0.75 cup butter, melted
- 2 tbsps chopped chocolate
- 1 tbsp cream
- Chopped peanuts
- Chopped pretzels
- Homemade whipped cream
- 1 tsp vanilla
Instructions
- Crust Preparation: Pulverize pretzels and combine with melted butter, pressing firmly into a parchment-lined springform pan to create a crisp, sturdy base.
- Chocolate Ganache Creation: Melt chocolate with cream using short microwave intervals, stirring carefully to produce a silky, glossy mixture. Allow to cool slightly while maintaining a pourable consistency.
- Cheesecake Filling Development: Whip cream cheese until smooth, then blend in sugar, peanut butter, and vanilla, beating until light and fluffy. Integrate the cooled chocolate ganache, mixing thoroughly to create a uniform, luxurious filling.
- Cream Incorporation: Whip remaining cream to stiff peaks, then gently fold into the cheesecake mixture to preserve its airy texture and volume.
- Chilling and Setting: Pour the filling into the pretzel crust, smoothing the surface evenly. Refrigerate for a minimum of 8 hours to allow flavors to develop and texture to solidify completely.
- Finishing Touches: Craft a chocolate drizzle by microwaving chocolate and cream in brief bursts, stirring to prevent scorching. Once cooled to room temperature, elegantly cascade over the chilled cheesecake. Garnish with chopped peanuts and crushed pretzels for added texture and visual intrigue.
- Storage and Preservation: Refrigerate for up to one week or freeze for 2-3 months, ensuring a decadent dessert is always available for spontaneous indulgence.
Notes
- Pretzel Crust Pro Tip: Press the crumb mixture firmly and evenly to prevent crumbling and ensure a stable base for your cheesecake.
- Chocolate Melting Mastery: Use short microwave bursts and stir consistently to avoid burning, creating a smooth ganache with perfect glossy texture.
- Whipping Wisdom: Beat cream cheese until ultra-smooth and aerate the mixture thoroughly to achieve a light, decadent filling that melts in your mouth.
- Chilling Strategy: Allow minimum 8 hours refrigeration to develop deep flavor fusion and set the cheesecake’s luxurious texture, improving overall taste and consistency.
- Prep Time: 20 minutes
- Cook Time: 0 minutes
- Category: Desserts
- Method: None
- Cuisine: American
Nutrition
- Serving Size: 13
- Calories: 487
- Sugar: 30 g
- Sodium: 360 mg
- Fat: 34 g
- Saturated Fat: 20 g
- Unsaturated Fat: 12 g
- Trans Fat: 0 g
- Carbohydrates: 36 g
- Fiber: 1 g
- Protein: 7 g
- Cholesterol: 90 mg
Mia Reynolds
Food Writer & Home Cooking Specialist
Expertise
Easy Home Baking, Recipe Writing and Storytelling, Local and Seasonal Ingredients, Baking for Beginners
Education
New England Culinary Institute (NECI), Montpelier, Vermont
Community College of Vermont, Winooski, Vermont
Mia Reynolds fell in love with baking as a teenager experimenting in her family kitchen. Her passion took her to New England Culinary Institute, where she learned practical pastry techniques, and later to Community College of Vermont to deepen her understanding of food management.
Mia combines clear, simple baking instructions with heartwarming stories, making home baking approachable for everyone.