
Cheesy Bean Dip Recipe: Irresistible Party Pleaser
Melted cheese and creamy beans dance together in this irresistible cheesy bean dip that brings serious party vibes to any gathering.
Every spoonful promises a burst of rich, comforting flavors that will have everyone diving in for more.
The magic happens when warm, seasoned beans meet gooey, golden cheese in a stunning combination.
We layer bold spices and smooth textures to create a dip that stands out from the crowd.
Serve this crowd-pleaser with crispy tortilla chips or fresh vegetable sticks for the ultimate snacking experience.
Friends won’t be able to resist coming back for another scoop of this mouthwatering, crowd-winning dip.
Quick Recipe Overview
Cheesy Bean Dip Ingredient Breakdown
For Base Ingredients:For Cheese Elements:For Fresh Garnish:Tools for Melting and Mixing Cheesy Bean Dip
Steps to Make Cheesy Bean Dip from Scratch
Cozy up your kitchen and get ready for a crowd-pleasing dip that’ll have everyone asking for seconds.
Toss all the creamy, zesty ingredients into a big mixing bowl, blending them into a smooth, tantalizing mixture that promises to excite taste buds.
Pour the rich concoction into a baking dish, creating a canvas of deliciousness. Crown the top with a generous layer of melty cheese that’ll transform into a golden, bubbling masterpiece.
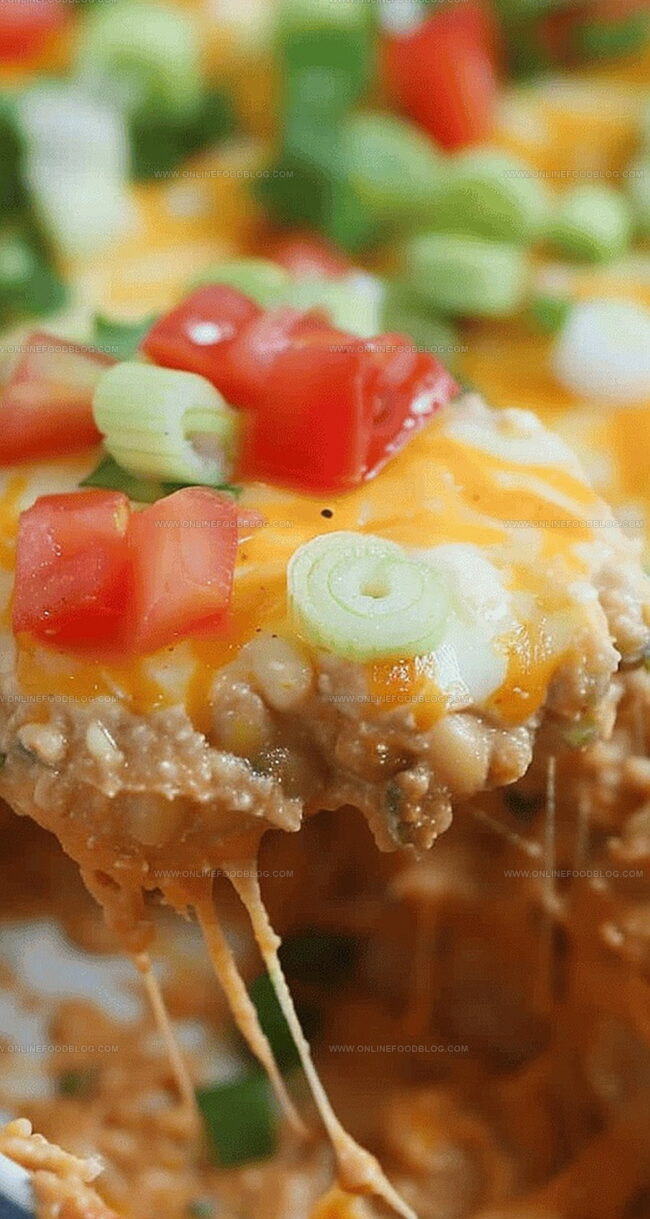
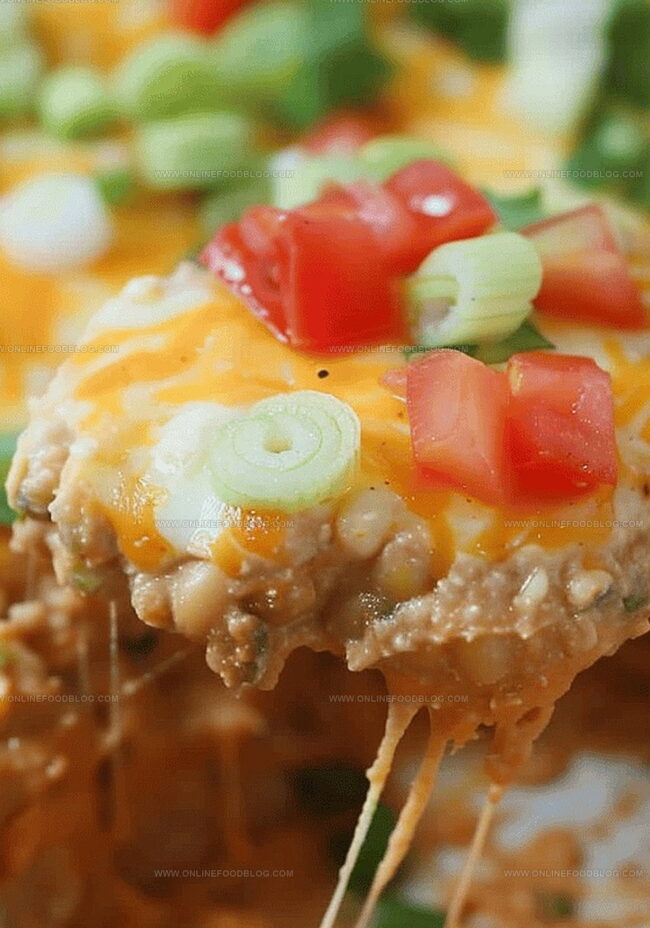
Pull the dip from the oven when it’s reached cheese heaven – all golden and irresistibly bubbly. Sprinkle fresh tomatoes and green onions for a pop of color and extra flavor that’ll make this dip instagram-worthy.
Dive right in while it’s hot, surrounded by crispy chips or veggie sticks. Watch as friends and family gather around, drawn by the mouthwatering aroma and creamy texture of this ultimate party starter.
Flavor Tweaks for Spicier or Creamier Cheesy Dip
Serving Cheesy Bean Dip with Chips or Veggies
How to Store and Reheat Cheesy Bean Dip Smoothly
Print
Smooth Cheesy Bean Dip
- Total Time: 40 minutes
- Yield: 9 1x
Description
Creamy cheesy bean dip blends Mexican-inspired flavors for irresistible party appetizers. Warm spices and melted cheese create an addictive snack you’ll want to share with friends.
Ingredients
- 30 oz (850 g) refried beans (traditional or jalapeno)
- 3 cups (340 g) shredded cheddar cheese (reserve 2 cups for topping)
- 8 oz (226 g) cream cheese (room temperature)
- ½ cup (120 ml) salsa
- ½ cup (120 ml) sour cream
- 1 tbsp taco seasoning
- ½ cup (75 g) tomatoes (diced)
- 2 large green onions (sliced)
Instructions
- Preheat: Warm the oven to 350°F (175°C), creating an ideal thermal environment for the dip’s transformation.
- Blend Ingredients: In a large mixing bowl, combine refried beans, cream cheese, salsa, sour cream, half of the shredded cheese, and taco seasoning. Whisk until the mixture becomes a harmonious, smooth composition.
- Layer and Top: Pour the bean mixture into a square baking dish, spreading it evenly. Sprinkle the remaining cheese across the surface, ensuring complete coverage for a luscious, melted finish.
- Bake and Finish: Slide the dish into the preheated oven and bake for 30 minutes until the cheese bubbles and turns a golden-brown hue. Remove from the oven and garnish with diced tomatoes and sliced green onions for a vibrant, fresh accent.
- Serve: Present the dip immediately while piping hot, accompanied by an assortment of dipping vessels for an irresistible appetizer experience.
Notes
- Cheese Selection Matters: Choose a melty cheese like cheddar or Monterey Jack for the best gooey texture and rich flavor profile.
- Salsa Swap Tip: Use mild or spicy salsa depending on your heat preference, which dramatically changes the overall taste of the dip.
- Baking Precision: Watch the dip closely after 25 minutes to prevent over-browning and ensure a perfectly golden cheese topping.
- Make-Ahead Magic: Prepare the dip ingredients up to 24 hours in advance and refrigerate, then bake just before serving for maximum convenience.
- Prep Time: 10 minutes
- Cook Time: 30 minutes
- Category: Appetizer, Snacks
- Method: Baking
- Cuisine: Mexican
Nutrition
- Serving Size: 9
- Calories: 272
- Sugar: 2 g
- Sodium: 688 mg
- Fat: 18 g
- Saturated Fat: 10 g
- Unsaturated Fat: 8 g
- Trans Fat: 0 g
- Carbohydrates: 20 g
- Fiber: 5 g
- Protein: 12 g
- Cholesterol: 45 mg
Mia Reynolds
Food Writer & Home Cooking Specialist
Expertise
Easy Home Baking, Recipe Writing and Storytelling, Local and Seasonal Ingredients, Baking for Beginners
Education
New England Culinary Institute (NECI), Montpelier, Vermont
Community College of Vermont, Winooski, Vermont
Mia Reynolds fell in love with baking as a teenager experimenting in her family kitchen. Her passion took her to New England Culinary Institute, where she learned practical pastry techniques, and later to Community College of Vermont to deepen her understanding of food management.
Mia combines clear, simple baking instructions with heartwarming stories, making home baking approachable for everyone.