
Quick & Creamy Pumpkin Cheesecake Cups Recipe for Fall Joy
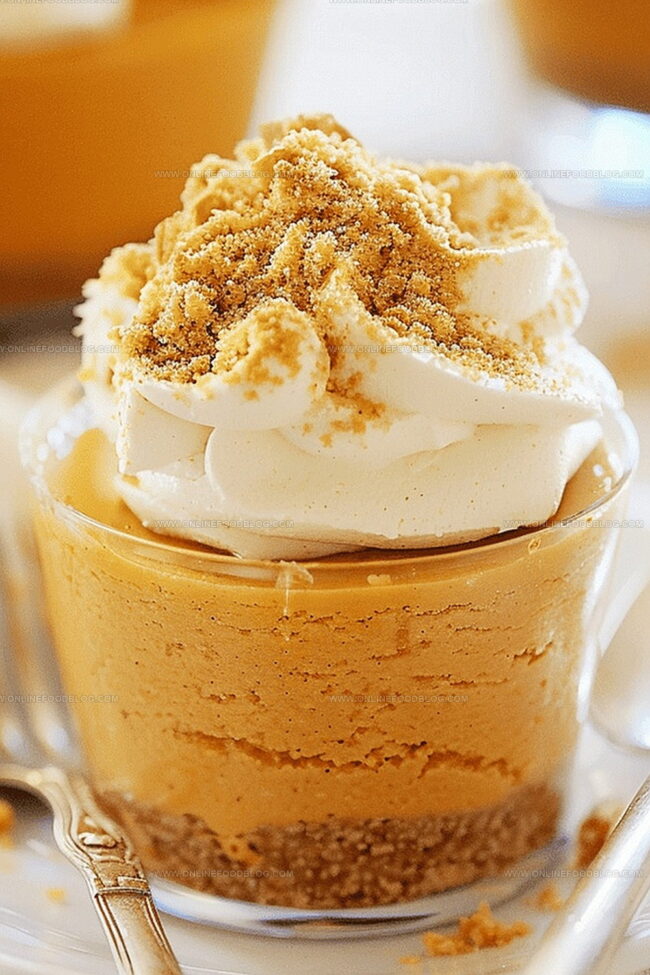
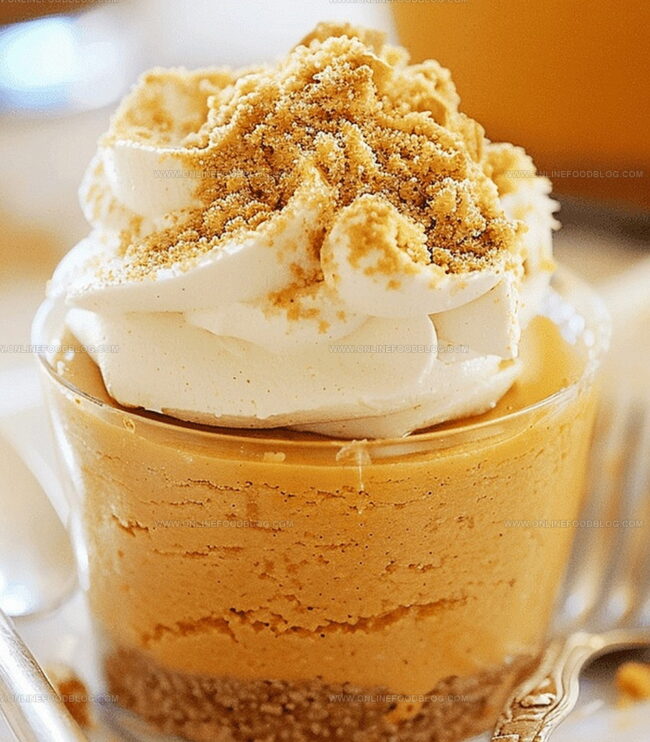
Silky pumpkin cheesecake cups blend autumn’s warmth with creamy indulgence, offering a delightful twist on classic dessert traditions.
These miniature treats capture the essence of seasonal comfort in every elegant bite.
Smooth and rich, they promise a luxurious experience that changes ordinary moments into memorable celebrations.
Crafted with carefully balanced ingredients, the cups deliver a harmonious symphony of spices and velvety texture.
Their compact size makes them perfect for intimate gatherings or spontaneous sweet cravings.
Each cup represents a carefully orchestrated dance of flavors that tantalize the palate without overwhelming the senses.
Perfectly portioned and effortlessly elegant, these desserts invite you to savor a moment of pure culinary bliss.
What Makes These Cheesecake Cups Shine
Everything for Easy Pumpkin Cheesecake Bliss
Crust Base:Cheesecake Filling:Topping:Layering Up Your Cheesecake Cups Right
Step 1: Prepare Graham Cracker Crust
Crush graham crackers in a food processor until fine crumbs form. Add:Pulse until ingredients are fully combined and stick together.
Step 2: Set Up Crust Bases
Spoon the crumb mixture into individual cups. Gently press down to create a firm base. Refrigerate while preparing filling.
Step 3: Create Cream Cheese Mixture
Using a stand mixer with paddle attachment, beat cream cheese until smooth and fluffy.
Step 4: Blend Pumpkin Flavors
Add to cream cheese mixture:Beat ingredients thoroughly, scraping bowl sides to ensure complete mixing.
Step 5: Incorporate Creamy Elements
Pour in sweetened condensed milk. Mix until perfectly blended.
Step 6: Fold in Whipped Topping
Switch mixer to whisk attachment. On lowest speed, gently fold in frozen whipped topping until evenly distributed.
Step 7: Chill and Set
Cover mixture and refrigerate for 1 hour to firm up and enhance flavors.
Step 8: Assemble Dessert Cups
Carefully spoon pumpkin cheesecake mixture over prepared graham cracker crust in each cup.
Step 9: Final Chill and Serve
Refrigerate cups until ready to serve. Optional: Top with additional whipped cream before serving for extra indulgence.
Tips for Creamy and Spiced Perfection
Store Pumpkin Cups the Smart Way
What Works Well with These Mini Treats
Flavorful Cheesecake Cup Spins to Enjoy
Print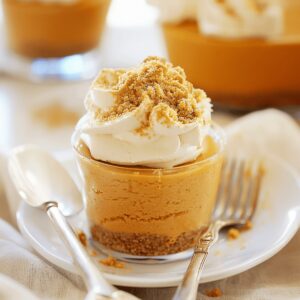
Simple Pumpkin Cheesecake Cups Recipe
- Total Time: 2 hours
- Yield: 6 1x
Description
Silky pumpkin cheesecake cups blend autumn’s warmth with creamy indulgence. Spiced graham cracker crusts and rich cream cheese filling make these miniature desserts an irresistible seasonal treat you’ll savor with pure delight.
Ingredients
Main Ingredients:
- 15 ounces (425 grams) pumpkin puree
- 8 ounces (230 grams) cream cheese, softened to room temperature
- 12 ounces (350 grams) frozen whipped topping, plus extra for garnish if desired
- 14 ounces (400 grams) sweetened condensed milk
Supporting Ingredients:
- 3 teaspoons pumpkin pie spice
- 1 ounce (25 grams) sugar-free cheesecake-flavored instant pudding mix
Instructions
- Transform graham crackers into fine, uniform crumbs using a food processor, creating a consistent texture for the base.
- Incorporate melted butter, granulated sugar, and brown sugar into the cracker crumbs, pulsing until the mixture binds together seamlessly.
- Distribute the crumb mixture evenly into individual serving cups, pressing gently to create a compact foundation.
- Chill the crumb base in the refrigerator to stabilize while preparing the filling.
- Using a stand mixer fitted with a paddle attachment, whip cream cheese until it becomes light, airy, and smooth.
- Blend in pumpkin puree, pumpkin pie spice, and instant pudding mix, thoroughly incorporating each ingredient and scraping down the bowl’s sides to ensure complete integration.
- Pour sweetened condensed milk into the mixture, mixing until the filling achieves a uniform, velvety consistency.
- Switch to the whisk attachment and gently fold in frozen whipped topping on the lowest speed, creating a soft, mousse-like texture.
- Cover the pumpkin cheesecake filling and refrigerate for approximately one hour to enhance firmness and flavor melding.
- Carefully spoon the chilled pumpkin mixture over the prepared graham cracker bases, filling each cup generously.
- Return the filled cups to the refrigerator until ready to serve, allowing the dessert to set completely.
- Optional: Garnish with an additional dollop of whipped topping just before presenting to enhance visual appeal and provide extra creamy indulgence.
Notes
- Prep Ahead Magic: Whip up these delightful cheesecake cups in advance and store in the refrigerator for a stress-free dessert that impresses guests effortlessly.
- Crumb Crust Secrets: Pulse graham crackers finely for a smooth, compact base that holds together perfectly without crumbling.
- Texture Tip: Use frozen whipped topping at the lowest mixer speed to maintain a light, airy texture that keeps the filling creamy and delicate.
- Make-Ahead Brilliance: These cups can be prepared up to 2 days before serving, allowing flavors to meld and develop a rich, decadent taste.
- Garnish Freedom: Top with extra whipped cream, a sprinkle of pumpkin pie spice, or crushed graham crackers for a personalized touch that elevates the dessert.
- Storage Wisdom: Keep refrigerated and consume within 3-4 days for the best flavor and freshest texture.
- Prep Time: 2 hours
- Cook Time: 0 minutes
- Category: Desserts, Snacks
- Method: Blending
- Cuisine: American
Nutrition
- Serving Size: 6
- Calories: 320 kcal
- Sugar: 22 g
- Sodium: 220 mg
- Fat: 18 g
- Saturated Fat: 12 g
- Unsaturated Fat: 5 g
- Trans Fat: 0.5 g
- Carbohydrates: 32 g
- Fiber: 1 g
- Protein: 6 g
- Cholesterol: 55 mg
Lucas Bennett
Founder & Recipe Creator
Expertise
Simple Everyday Recipes, Sustainable Cooking Practices, Creative Meal Planning, Recipe Testing and Improvement
Education
Fox Valley Technical College, Appleton, Wisconsin
Lake Superior College, Duluth, Minnesota
Lucas Bennett’s cooking journey started in his parents’ kitchen, where he learned to prepare tasty, no-fuss meals from scratch. His culinary passion led him to Fox Valley Technical College, where he gained practical cooking skills.
He then expanded his focus on sustainability at Lake Superior College. Today, Lucas shares easy, approachable recipes designed to make cooking enjoyable and stress-free for everyone.