
Dreamy No Bake Oreo Ganache Cheesecake Recipe for Sweet Fans
Dessert lovers rejoice as this no bake oreo ganache cheesecake sweeps you into a world of creamy decadence.
Layers of chocolatey goodness promise an indulgent treat that melts effortlessly on your tongue.
The smooth, rich combination of oreos and velvety cream cheese creates a luxurious dessert without ever touching an oven.
Each bite delivers a perfect balance of crunchy cookie and silky ganache that feels like a culinary masterpiece.
The recipe requires minimal effort but delivers maximum satisfaction with its stunning presentation.
Chocolate enthusiasts and dessert fanatics will fall head over heels for this irresistible no-bake sensation that transforms ordinary moments into extraordinary memories.
You’re about to embark on a delightful journey of pure chocolate bliss.
Quick Recipe Overview
Ingredients to Create No Bake Oreo Ganache Cheesecake
For The Crust:For The Cheesecake Filling:For The Topping And Decoration:Setup & Supplies for Oreo Ganache Cheesecake
How to Make No Bake Oreo Ganache Cheesecake
Oreo Cheesecake Bliss
Crush Oreo cookies into fine crumbs and blend with melted butter. Press mixture firmly into a springform pan, creating a solid base for your decadent dessert.
Whip cream cheese until silky smooth. Gently incorporate sweet sugars and aromatic vanilla. Fold in fluffy whipped cream and sprinkle crushed Oreo pieces throughout the mixture. Spread evenly over the cookie crust.
Warm rich cream and pour over chopped chocolate, stirring until glossy and luxurious. Drizzle the ganache over the chilled cheesecake, allowing it to cascade beautifully.
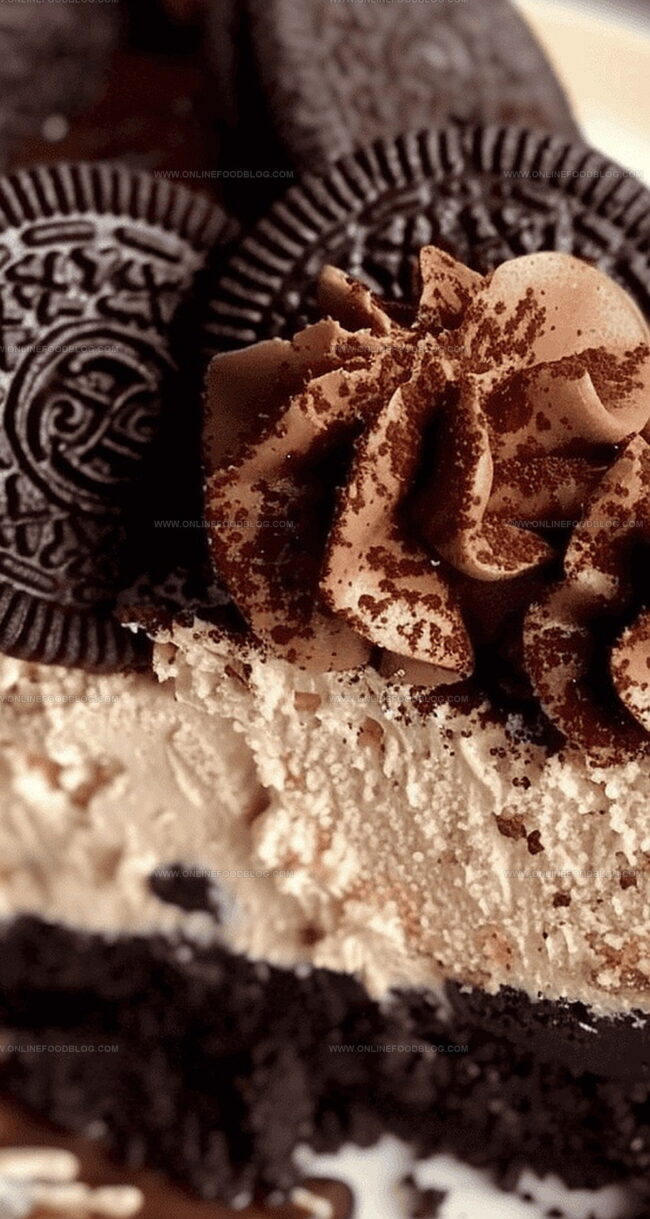
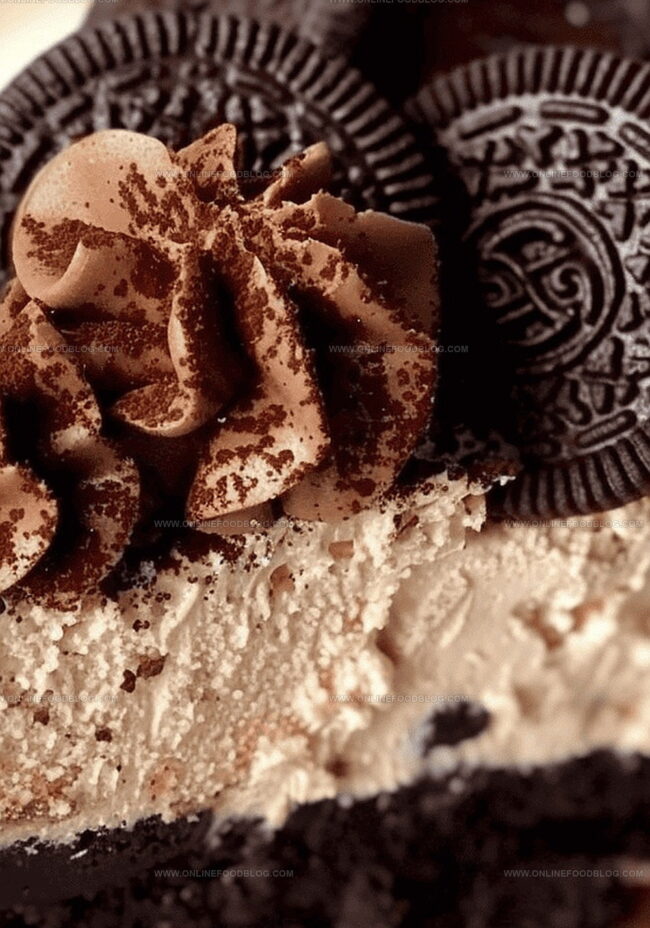
Enhance with delicate chocolate whipped cream swirls. Crown the masterpiece with a single Oreo cookie for an elegant presentation. Chill until serving time to let flavors meld and texture set perfectly.
Slice and serve chilled. Each bite promises a symphony of creamy, crunchy, chocolatey goodness that will delight dessert lovers of all ages.
Variations & Garnish Ideas for Oreo Cheesecake
Serving No Bake Oreo Cheesecakefully
Oreo Cheesecake: Safe Storage Advice
Print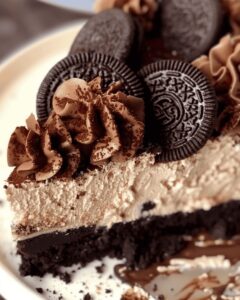
Silky Oreo Ganache Cheesecake
- Total Time: 6 hours 30 minutes
- Yield: 13 1x
Description
Creamy no bake oreo ganache cheesecake blends rich chocolate and smooth cream cheese in a delightful dessert. Oreo cookie crust and silky ganache topping make this treat irresistible for chocolate enthusiasts who crave indulgent flavors.
Ingredients
- 3 (8 oz) cream cheese blocks, softened
- 3 sleeves Oreo pack (24–28 Oreos), crushed
- ¾ cup crushed Oreos
- 2 (4 oz) chocolate bars, chopped
- 1 ¼ cups heavy cream
- 6 tbsps butter, melted
- ½ cup powdered sugar
- ¼ cup granulated sugar
- 5 Oreos, chopped
- ½ cup heavy cream, heated
- 2 tsps vanilla extract
- ¾ cup chocolate crunchies
- Chocolate whipped cream
- Additional Oreos for decoration
- 2–3 tbsps hard shell topping (optional)
Instructions
- Crust Creation: Pulverize Oreo cookies into fine crumbs, mixing with melted butter until achieving a damp sand-like consistency. Press mixture firmly into a springform pan, creating a compact, even base. Refrigerate to solidify.
- Cream Cheese Preparation: Whip cream cheese until silky smooth, eliminating any lumps. Blend granulated and powdered sugars thoroughly, then incorporate vanilla extract. Whip heavy cream to stiff, glossy peaks and gently fold into cream cheese mixture.
- Oreo Integration: Fold crushed Oreo pieces delicately throughout the creamy mixture, ensuring even distribution. Transfer filling onto prepared crust, smoothing the surface with a spatula for a uniform appearance.
- Chilling Phase: Refrigerate cheesecake for a minimum of six hours or preferably overnight to achieve complete set.
- Ganache Creation: Warm heavy cream until steaming, then pour over finely chopped chocolate. Stir until a smooth, glossy ganache forms. Drizzle evenly across the set cheesecake surface.
- Finishing Touches: Optional: Sprinkle chocolate crunchies over ganache for added texture. Chill briefly to set ganache. Decorate with piped chocolate whipped cream and garnish with a whole Oreo cookie before serving.
Notes
- Crust Consistency Check: Ensure cookie crumbs are uniformly mixed with butter, pressing firmly to create a stable, compact base that prevents crumbling.
- Cream Cheese Technique: Beat cream cheese at room temperature to eliminate lumps, creating a silky-smooth texture essential for creamy cheesecake.
- Folding Finesse: Gently fold whipped cream and Oreo pieces to maintain the cake’s light, airy structure and prevent deflating the mixture.
- Chilling Critical: Allow sufficient refrigeration time (minimum 6 hours) to set the cheesecake completely, ensuring perfect slicing and optimal flavor development.
- Prep Time: 30 minutes
- Cook Time: 0 minutes
- Category: Desserts
- Method: None
- Cuisine: American
Nutrition
- Serving Size: 13
- Calories: 400
- Sugar: 28g
- Sodium: 250mg
- Fat: 28g
- Saturated Fat: 17g
- Unsaturated Fat: 8g
- Trans Fat: 0g
- Carbohydrates: 36g
- Fiber: 1g
- Protein: 4g
- Cholesterol: 70mg
Mia Reynolds
Food Writer & Home Cooking Specialist
Expertise
Easy Home Baking, Recipe Writing and Storytelling, Local and Seasonal Ingredients, Baking for Beginners
Education
New England Culinary Institute (NECI), Montpelier, Vermont
Community College of Vermont, Winooski, Vermont
Mia Reynolds fell in love with baking as a teenager experimenting in her family kitchen. Her passion took her to New England Culinary Institute, where she learned practical pastry techniques, and later to Community College of Vermont to deepen her understanding of food management.
Mia combines clear, simple baking instructions with heartwarming stories, making home baking approachable for everyone.