
Zesty No Bake Chocolate Orange Cheesecake Recipe to Dazzle
Silky smooth no bake chocolate orange cheesecake recipes dance between decadent and refreshing, capturing dessert magic in every single bite.
Citrusy orange zest weaves through rich chocolate layers, creating a luxurious treat that feels simultaneously elegant and comforting.
Each spoonful promises a delightful contrast of tangy and sweet flavors that melt perfectly on your tongue.
The creamy texture glides effortlessly, making this dessert an irresistible showstopper for any gathering.
no oven required means less hassle and more enjoyment, perfect for busy cooks who want maximum impact with minimal effort.
chocolate and orange combine in a heavenly partnership that will have everyone asking for seconds.
Grab your ingredients and get ready to create a dessert that turns an ordinary evening into a gourmet experience.
Quick Recipe Overview
Ingredients in No Bake Chocolate Orange Cheesecake
For Crust:For Filling:For Topping:Tools That Help Build Chocolate Orange Cheesecake
How to Assemble This No Bake Cheesecake Perfectly
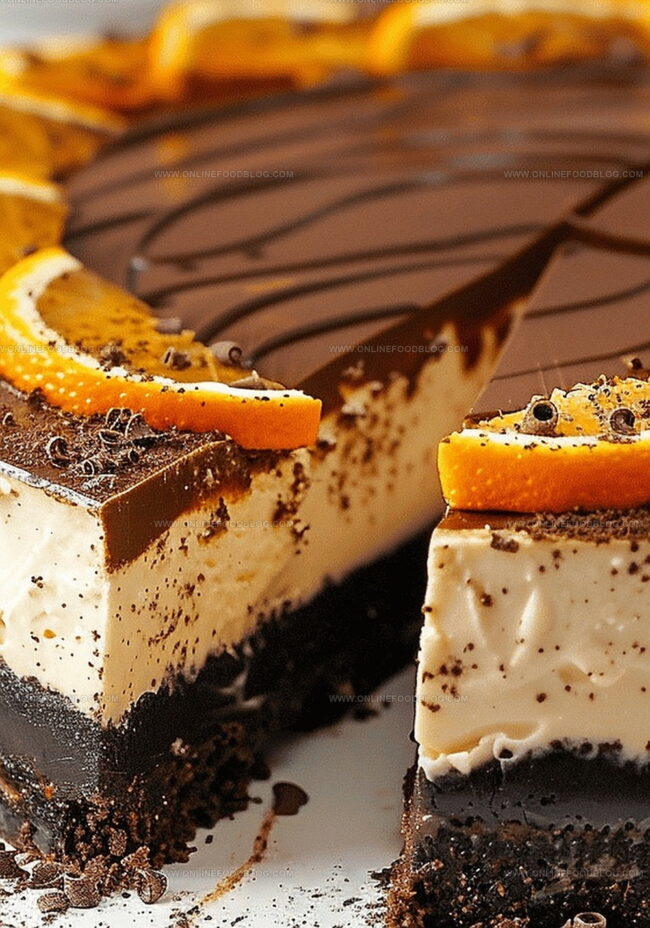
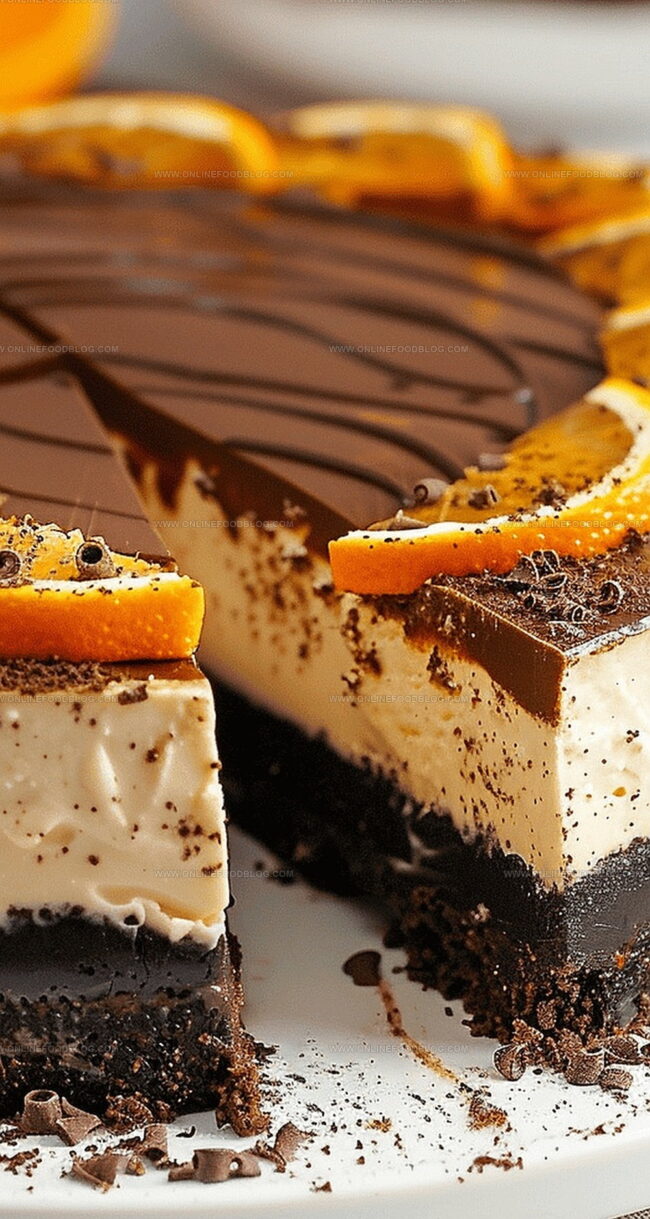
Crush chocolate sandwich cookies into fine crumbs, blend with melted butter until perfectly combined. Press mixture firmly into springform pan and chill while preparing remaining layers.
Soften cream cheese and gently fold with whipped cream. Separate mixture into two portions – one infused with bright citrus notes, another enriched with decadent chocolate.
Carefully spread orange-kissed layer across cookie base, then delicately drape chocolate layer on top. Allow cheesecake to rest and set in cool refrigerator for several hours.
Warm cream and pour over chopped chocolate, stirring until silky smooth. Generously cascade glaze across chilled cheesecake surface.
Release cheesecake from pan, garnish with delicate chocolate shavings and zesty orange sprinkles. Slice and serve this stunning dessert to delighted guests.
Tips to Balance the Citrus and Chocolate Flavors
How to Serve Chocolate Orange Cheesecake Beautifully
Chill and Store This Cheesecake the Right Way
Print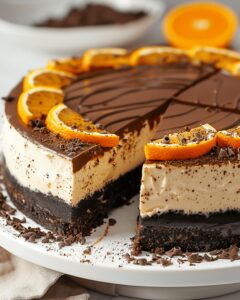
Silky Chocolate Orange Cheesecake
- Total Time: 30 minutes
- Yield: 9 1x
Description
Rich layers of no bake chocolate orange cheesecake showcase perfect harmony between tangy citrus and smooth chocolate. Chilled dessert offers creamy indulgence that satisfies sweet cravings while delighting palates with elegant flavor combinations you will savor.
Ingredients
- 2.5 cups oreo cookie crumbs
- 16 oz (454 g) cream cheese
- 2 cups heavy cream
- 10 oz (284 g) bittersweet chocolate
- 6 oz (170 g) bittersweet chocolate
- 6 tbsps unsalted butter
- 1 cup powdered sugar
- 1 zest of orange
- 0.5 tsp orange extract
- Orange food coloring (optional)
- 0.5 cup heavy cream
- Chocolate sprinkles (optional)
- Orange zest (optional)
Instructions
- Crust Preparation: Pulverize Oreo cookies in a food processor and blend with melted butter until uniformly moist. Press the crumb mixture firmly into a lightly greased 9-inch springform pan, creating an even base layer. Chill in the freezer during filling preparation.
- Chocolate and Cream Cheese Mixture: Melt bittersweet chocolate and allow to cool to room temperature. Cream together cream cheese and powdered sugar until smooth. Whip heavy cream until soft peaks form, then gently fold into the cream cheese mixture.
- Flavor Layering: Divide the mixture into two bowls. Infuse one portion with orange zest, orange extract, and food coloring to create a vibrant orange-hued filling. Blend melted chocolate into the second portion until uniformly integrated.
- Assembly and Chilling: Spread the orange-infused layer evenly across the chilled crust, then carefully cascade the chocolate layer on top to create a marbled effect. Refrigerate for 3-4 hours until completely set and firm.
- Ganache Topping: Heat heavy cream until gently simmering. Pour over finely chopped chocolate, stirring until a glossy ganache forms. Once the cheesecake has set, pour the ganache over the top, ensuring even coverage.
- Serving Preparation: Return the cheesecake to the refrigerator to set the chocolate topping. Release from the springform pan and transfer to a serving plate. Optionally, garnish with chocolate shavings and fresh orange zest. Slice and serve chilled for optimal enjoyment.
Notes
- Crust Compression Technique: Press the Oreo cookie crumb mixture firmly and evenly to create a solid, stable base that prevents crumbling when serving.
- Chocolate Melting Mastery: Cool melted chocolate to room temperature before incorporating to prevent seizing and maintain a smooth texture in the cheesecake layers.
- Whipping Cream Precision: Achieve soft peaks carefully to ensure light, airy texture without overbeating, which can cause grainy or butter-like consistency.
- Ganache Pouring Pro Tip: Allow ganache to cool slightly before pouring to prevent melting the top layer and to create a smooth, glossy chocolate finish.
- Prep Time: 30 minutes
- Cook Time: 0 minutes
- Category: Desserts, Snacks
- Method: Blending
- Cuisine: British
Nutrition
- Serving Size: 9
- Calories: 466
- Sugar: 35 g
- Sodium: 200 mg
- Fat: 38 g
- Saturated Fat: 23 g
- Unsaturated Fat: 15 g
- Trans Fat: 0 g
- Carbohydrates: 34 g
- Fiber: 1 g
- Protein: 6 g
- Cholesterol: 105 mg
Mia Reynolds
Food Writer & Home Cooking Specialist
Expertise
Easy Home Baking, Recipe Writing and Storytelling, Local and Seasonal Ingredients, Baking for Beginners
Education
New England Culinary Institute (NECI), Montpelier, Vermont
Community College of Vermont, Winooski, Vermont
Mia Reynolds fell in love with baking as a teenager experimenting in her family kitchen. Her passion took her to New England Culinary Institute, where she learned practical pastry techniques, and later to Community College of Vermont to deepen her understanding of food management.
Mia combines clear, simple baking instructions with heartwarming stories, making home baking approachable for everyone.