
Creamy No-Bake Kit Kat Cheesecake Recipe for Sweet Layered Joy
Kit kat cheesecake delivers a dreamy dessert experience that upgrades ordinary ingredients into an extraordinary treat.
Chocolate lovers rejoice at this decadent creation mixing creamy textures with crisp wafer sensations.
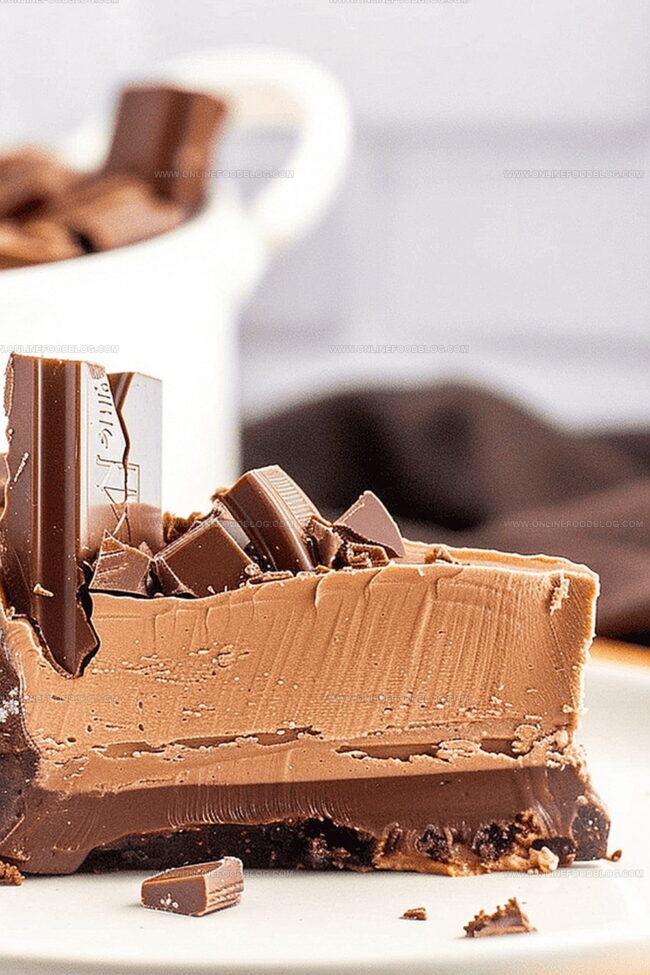
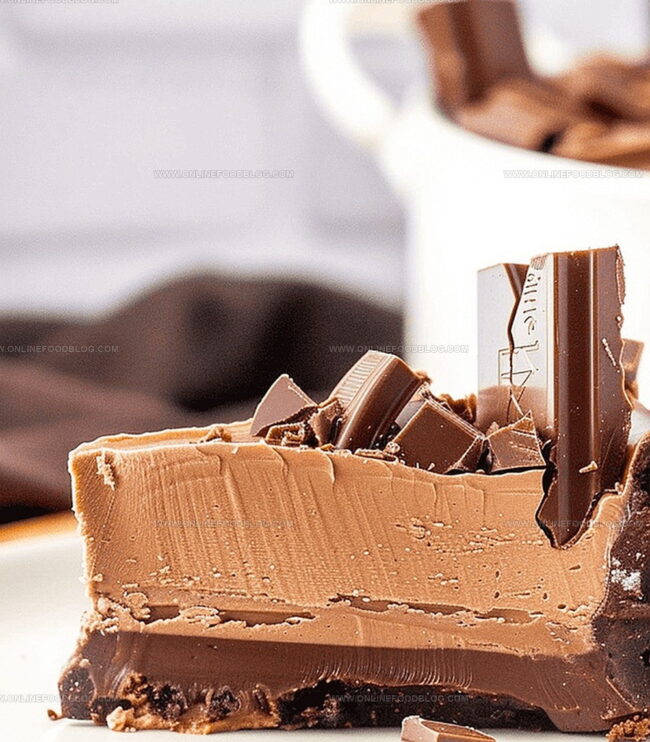
Rich layers blend smooth cream cheese with irresistible chocolate-covered cookie pieces, creating a luxurious sensation that melts effortlessly.
Smooth and indulgent, this dessert requires zero baking skills, making it perfect for novice and experienced cooks alike.
The minimal preparation time means you can whip up an impressive sweet in mere minutes.
Minimal kitchen equipment and basic ingredients guarantee a stress-free culinary adventure that impresses family and friends.
Each bite promises a symphony of flavor that balances sweetness with delicate crunch.
Why This Kit Kat Cheesecake Is a No-Bake Dream
What You Need to Build the Ultimate Kit Kat Cake
Base Ingredients:Filling Ingredients:Garnish and Serving Ingredients:Assemble, Chill, and Slice Your Sweet Masterpiece
Step 1: Create the Crunchy Base
Crush Oreo cookies using a food processor or place in a sealed bag and crush with a rolling pin until finely ground. Melt butter and mix thoroughly with cookie crumbs until mixture resembles wet sand. Press the mixture firmly into an 8-inch springform pan, creating an even layer.
Step 2: Line Pan With Kit Kat Bars
Carefully arrange Kit Kat bars around the inner edges of the pan, ensuring they stand upright and cover the entire circumference. Trim bars if needed to create a perfect fit.
Step 3: Prepare Creamy Cheesecake Filling
Ensure cream cheese is at room temperature. In a large mixing bowl, whip cream cheese until completely smooth and free of lumps. Gradually add:Whisk ingredients until fully combined and the mixture becomes homogeneous.
Step 4: Assemble and Freeze
Pour the cheesecake filling over the Oreo base, carefully spreading it evenly. Gently tap the pan to remove any air bubbles. Place in the freezer for 2-3 hours or until the cheesecake is completely firm.
Step 5: Serve and Enjoy
Remove the cheesecake from the freezer and let it thaw slightly for 10-15 minutes before serving. Slice and enjoy the decadent, creamy dessert with its crunchy Kit Kat border.
Tips for Crunch, Cream, and Everything in Between
Keep It Cold, Crunchy, and Creamy After Serving
What Flavors Make Kit Kat Cheesecake Even Better
Fun Spins on the Classic Candy-Inspired Treat
Print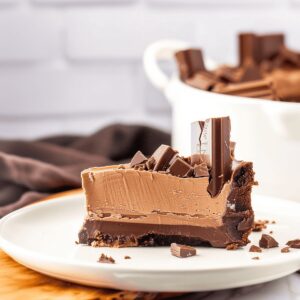
No-Bake Kit Kat Cheesecake Recipe
- Total Time: 3 hours 20 minutes
- Yield: 8 1x
Description
Silky Kit Kat Cheesecake delivers a dreamy chocolate-covered dessert without turning on the oven. Chocolate wafer layers nestled in creamy filling create irresistible indulgence you cannot resist.
Ingredients
Main Ingredients:
- 3 extra-large Kit Kat bars
- 16 ounces (454 grams) cream cheese, room temperature
- ¾ cup (180 milliliters) heavy whipping cream
- ¾ cup (150 grams) white granulated sugar
Chocolate Components:
- ⅓ cup (40 grams) cocoa powder
Flavor Enhancers:
- 1 teaspoon (5 milliliters) vanilla extract
Instructions
- Create a fine, uniform crumb by pulverizing Oreo cookies in a food processor or by placing them in a sealed plastic bag and crushing with a rolling pin until they resemble fine sand.
- Melt unsalted butter (113 grams or ) and thoroughly combine with cookie crumbs until the mixture resembles wet, compact sand that holds together when pressed.
- Transfer the buttery crumb mixture into an 8-inch (20 centimeters) springform pan, pressing firmly and evenly across the bottom to create a compact base.
- Carefully arrange Kit Kat bars vertically around the inner circumference of the pan, ensuring they stand upright and create a decorative border.
- Ensure cream cheese (453 grams or ) is completely softened to room temperature to prevent lumps and achieve a silky smooth texture.
- Using an electric mixer, whip cream cheese until light and fluffy, scraping down the sides of the bowl to incorporate all ingredients evenly.
- Gradually incorporate heavy cream (240 milliliters or ), granulated sugar (100 grams or ), unsweetened cocoa powder (30 grams or ), and pure vanilla extract (15 milliliters or ), mixing until the filling becomes completely homogeneous and free of any streaks.
- Gently pour the chocolate cheesecake mixture over the prepared Oreo base, ensuring an even distribution and carefully not disturbing the Kit Kat border.
- Place the assembled cheesecake in the freezer for 2-3 hours, or until the filling is completely set and firm to the touch.
- Remove from freezer approximately 10-15 minutes before serving to allow slight thawing, which will enhance the creamy texture and make slicing easier.
- Slice and serve, revealing the dramatic Kit Kat border and smooth chocolate cheesecake interior.
Notes
- Crush Oreos thoroughly for a solid, compact base that holds together perfectly.
- Use room temperature cream cheese to guarantee a silky-smooth, lump-free filling.
- Line pan edges with Kit Kat bars before pouring filling for a stunning chocolate-bar border.
- Freeze cheesecake completely to achieve the ideal firm texture and easy slicing.
- Scrape mixing bowl sides consistently to blend ingredients uniformly and prevent uneven mixture.
- Thaw dessert slightly before serving to enhance creamy consistency and release maximum flavor.
- Prep Time: 20 minutes
- Cook Time: 3 hours
- Category: Desserts
- Method: Blending
- Cuisine: American
Nutrition
- Serving Size: 8
- Calories: 385 kcal
- Sugar: 28 g
- Sodium: 170 mg
- Fat: 28 g
- Saturated Fat: 16 g
- Unsaturated Fat: 10 g
- Trans Fat: 0.5 g
- Carbohydrates: 32 g
- Fiber: 1 g
- Protein: 5 g
- Cholesterol: 75 mg
Lucas Bennett
Founder & Recipe Creator
Expertise
Simple Everyday Recipes, Sustainable Cooking Practices, Creative Meal Planning, Recipe Testing and Improvement
Education
Fox Valley Technical College, Appleton, Wisconsin
Lake Superior College, Duluth, Minnesota
Lucas Bennett’s cooking journey started in his parents’ kitchen, where he learned to prepare tasty, no-fuss meals from scratch. His culinary passion led him to Fox Valley Technical College, where he gained practical cooking skills.
He then expanded his focus on sustainability at Lake Superior College. Today, Lucas shares easy, approachable recipes designed to make cooking enjoyable and stress-free for everyone.