
Tangy Pistachio Honey Baklava Cheesecake Recipe for Dessert
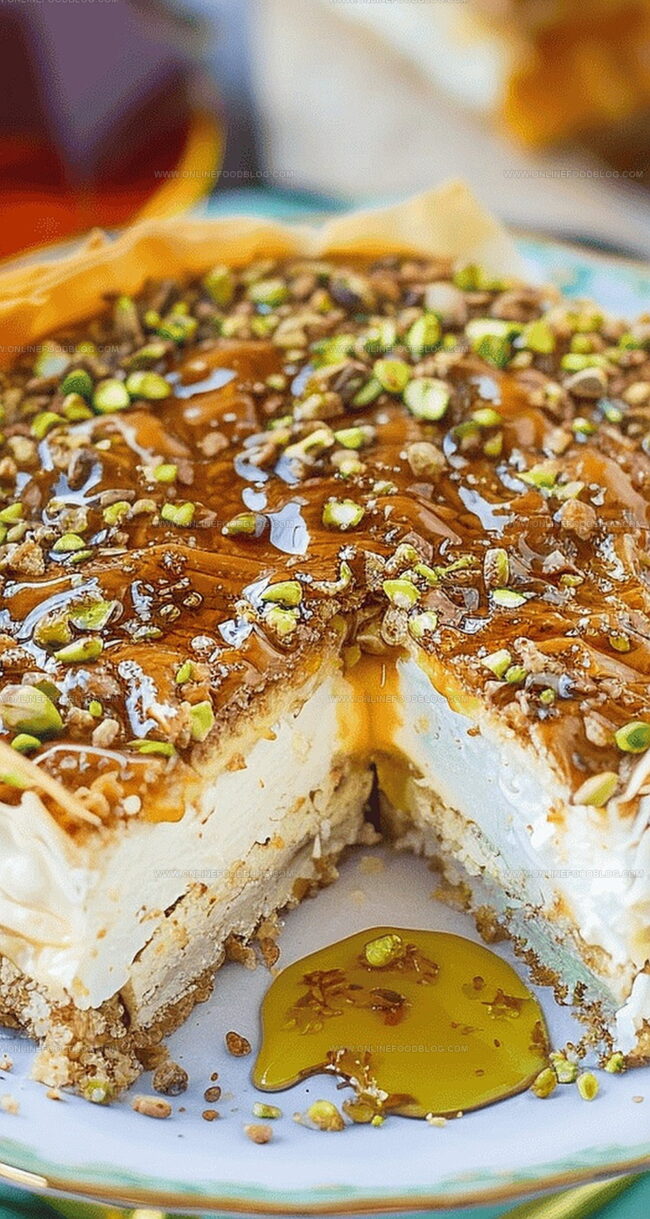
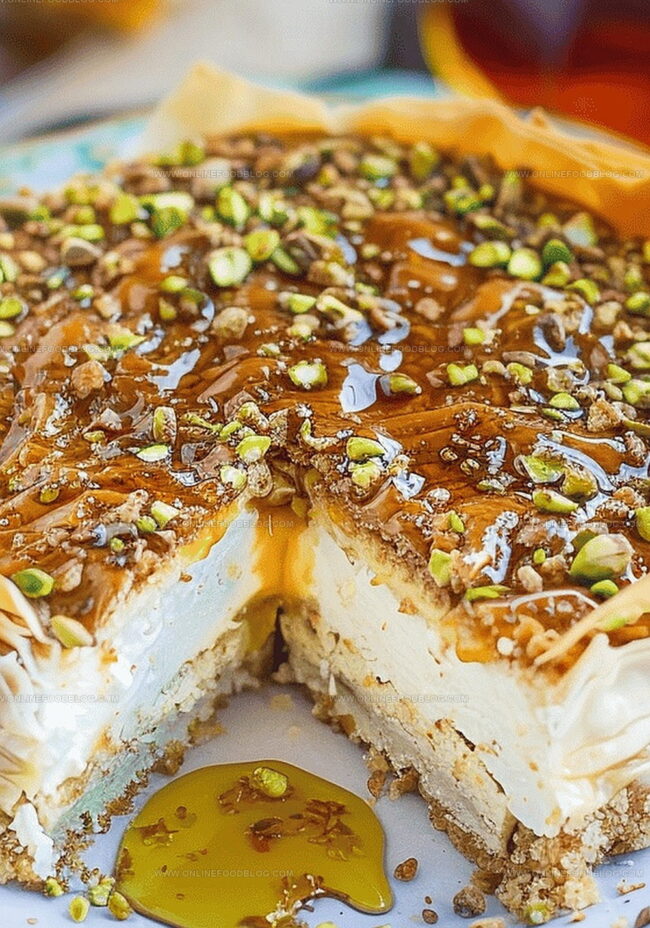
Decadent layers of nutty richness dance with sweet honey in this irresistible homemade pistachio honey baklava cheesecake that promises a symphony of textures.
Crisp phyllo pastry weaves through creamy cheesecake, creating a dessert that tells a story of Mediterranean indulgence.
Each forkful blends traditional baklava elements with modern cheesecake elegance, delivering a luxurious experience.
Pistachios add a delightful crunch and earthy depth to every slice.
The honey drizzle brings a golden warmth that elevates this dessert from ordinary to extraordinary.
Layers of flavor and tradition meld together in a celebration of culinary creativity.
You won’t be able to resist this show-stopping dessert that transforms a classic treat into a masterpiece of sweet perfection.
Quick Recipe Overview
Ingredients That Make Homemade Pistachio Honey Baklava Cheesecake Shine
For Creamy Base:For Binding Elements:For Nutty Crunch:For Crispy Foundation:Tools You Need for Baklava Cheesecake Success
How to Make Homemade Pistachio Honey Baklava Cheesecake
Gather all essential ingredients and equipment. Select a spacious kitchen workspace with clean surfaces and precise measuring tools. Ensure cream cheese is soft and room temperature for smooth blending.
Layer delicate fillo pastry sheets carefully, creating a buttery and crisp base. Gently brush each translucent sheet with golden melted butter, building a delectable foundation that will cradle the creamy filling.
Whip cream cheese until silky and luxurious. Incorporate sweet honey, fragrant vanilla, and tangy sour cream. Gently fold eggs into the mixture, maintaining a soft, velvety texture. Sprinkle chopped pistachio nuts for delightful crunch and nutty flavor.
Wrap springform pan securely with aluminum foil. Position pan inside a larger water bath to ensure gentle, even heat distribution. Bake at low temperature, allowing cheesecake to set slowly and develop rich, complex flavors.
Allow cheesecake to rest overnight in refrigerator. This patient approach enhances texture and allows flavors to meld beautifully. When ready, release from pan and garnish with additional pistachio nuts for elegant presentation.
Tips for Crunch, Cream, and Honey Layers
Serving the Baklava Cheesecake with Style
How to Store Homemade Baklava Cheesecake Perfectly
Print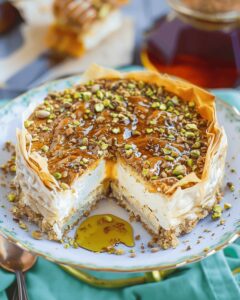
Luxurious Pistachio Honey Baklava Cheesecake
- Total Time: 14.5 hours
- Yield: 13 1x
Description
Creamy pistachio honey baklava cheesecake blends Middle Eastern dessert traditions with classic cheesecake. Rich layers of nutty pistachios, sweet honey, and smooth cream cheese create a delightful Mediterranean-inspired treat you’ll savor to the last bite.
Ingredients
- 32 oz (907 g) cream cheese, softened
- 4 large eggs, room temperature
- 1 package fillo dough, about 12 sheets
- 1 ⅓ cups (200 g) pistachios, salted, roasted, shelled, divided
- ½ cup (100 g) white granulated sugar
- ½ cup (170 g) honey
- 1 cup (240 ml) sour cream
- 2 tsps vanilla extract
- ⅓ cup (75 g) unsalted butter, melted
- ¼ cup (85 g) honey, for serving
Instructions
- Fillo Preparation: Carefully unroll fillo dough, keeping layers delicate and pristine. Meticulously brush each translucent sheet with melted butter, creating multiple layers for a crisp, golden foundation.
- Crust Formation: Press the buttered fillo layers into a springform pan, allowing edges to climb slightly, forming an elegant, textured rim that will cradle the creamy filling.
- Cheesecake Base: Whip cream cheese until ultra-smooth, eliminating any potential lumps. Blend in honey, sugar, vanilla, and sour cream until achieving a luxurious, silky consistency.
- Batter Development: Gently incorporate eggs one at a time, maintaining the batter’s delicate structure. Fold in most of the chopped pistachios, reserving some for a decorative garnish.
- Assembly and Baking: Pour the pistachio-infused batter into the fillo crust, ensuring even distribution. Sprinkle remaining pistachios on top. Position the springform pan in a water bath and bake in a preheated oven at a gentle temperature for approximately two hours.
- Cooling and Setting: After baking, turn off the oven and let the cheesecake cool gradually to prevent surface cracking. Refrigerate overnight, allowing flavors to meld and texture to become perfectly creamy and set.
Notes
- Handle Fillo Dough with Care: Treat the delicate fillo sheets like precious tissue paper, working slowly and gently to prevent tearing or breaking during preparation.
- Butter is Your Friend: Generously brush each fillo layer with melted butter to create a crispy, golden foundation that adds rich flavor and structural integrity to the cheesecake.
- Prevent Cheesecake Cracks: Use a water bath and gradual cooling technique to ensure a smooth, crack-free surface and creamy texture throughout the dessert.
- Pistachio Power: Toast chopped pistachios briefly before adding to enhance their nutty flavor and provide a delightful crunch that elevates the entire dessert experience.
- Prep Time: 30 minutes
- Cook Time: 2 hours
- Category: Desserts
- Method: Baking
- Cuisine: Middle Eastern
Nutrition
- Serving Size: 13
- Calories: 457
- Sugar: 25 g
- Sodium: 284 mg
- Fat: 29 g
- Saturated Fat: 16 g
- Unsaturated Fat: 10 g
- Trans Fat: 0 g
- Carbohydrates: 43 g
- Fiber: 2 g
- Protein: 9 g
- Cholesterol: 107 mg
Mia Reynolds
Food Writer & Home Cooking Specialist
Expertise
Easy Home Baking, Recipe Writing and Storytelling, Local and Seasonal Ingredients, Baking for Beginners
Education
New England Culinary Institute (NECI), Montpelier, Vermont
Community College of Vermont, Winooski, Vermont
Mia Reynolds fell in love with baking as a teenager experimenting in her family kitchen. Her passion took her to New England Culinary Institute, where she learned practical pastry techniques, and later to Community College of Vermont to deepen her understanding of food management.
Mia combines clear, simple baking instructions with heartwarming stories, making home baking approachable for everyone.