
Irresistible Tagalong Cookies Recipe: Homemade Sweet Bliss
Sweet memories of childhood blend perfectly with this irresistible tagalong cookies recipe that captures pure nostalgic delight.
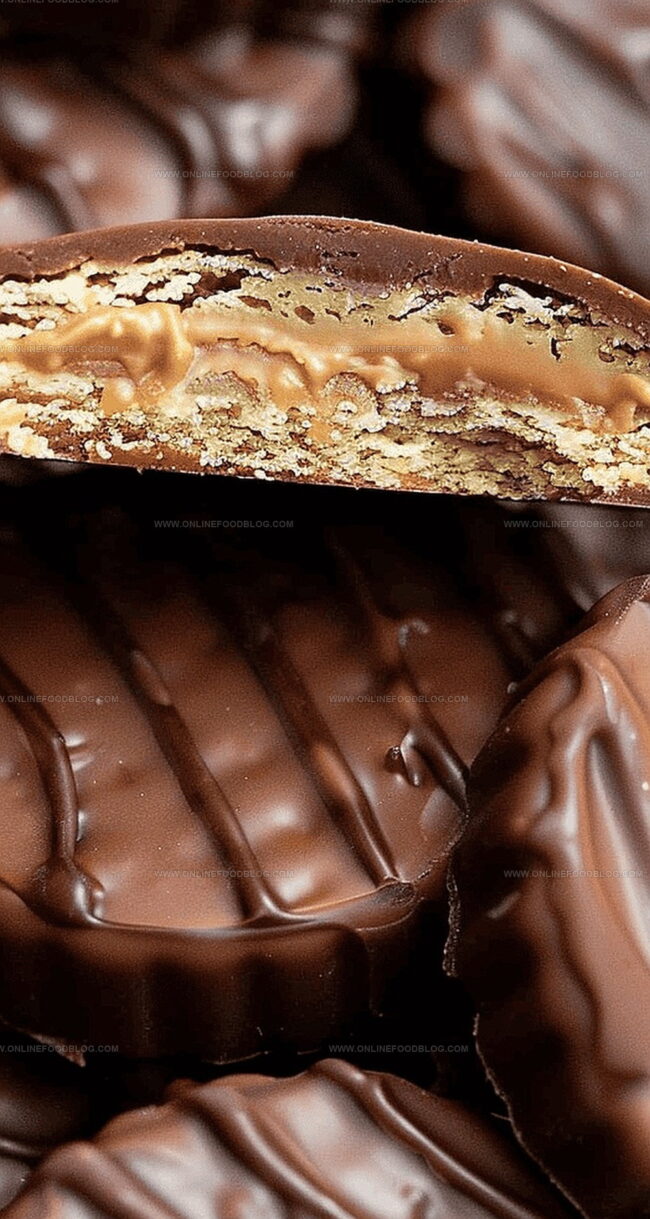
These chocolate-covered peanut butter treats bring back warm memories of after-school snacking and cookie drives.
Crisp shortbread creates a delicate foundation for creamy peanut butter filling, while rich chocolate coating adds decadent charm.
Each bite delivers a harmonious balance of textures and flavors that dance across your palate.
Crafted with simple ingredients and minimal effort, these homemade cookies surpass any store-bought version.
You’ll love how quickly these delectable treats come together in your own kitchen.
Dive into this delightful recipe and recreate a classic favorite that sparks joy with every single bite.
Quick Recipe Overview
Ingredients for Homemade Tagalong Cookies
For Cookie Base:For Creamy Filling:For Chocolate Coating:Baking Tools for Tagalong Cookie Creation
How to Bake Your Own Tagalong Cookies

Blend softened butter and sugar in a mixer until creamy and smooth. Add golden egg yolks and fragrant vanilla, mixing until perfectly combined. Gently fold in flour and a pinch of salt, forming a soft, pliable dough ball.
Divide the delicate dough into two elegant logs, each about the width of a thick marker. Wrap carefully in clingy plastic and let rest in the chilled sanctuary of your refrigerator for nearly an hour.
Warm your oven to a cozy 350°F. Slice the rested dough into delicate rounds and arrange on a lined baking sheet. Bake until edges turn a soft, golden brown, around 12 minutes. Allow cookies to cool completely on a wire rack.
Whip together smooth butter and rich peanut butter until cloud-like. Fold in powdered sugar and a splash of vanilla, creating a luscious, silky filling. Transfer to a piping tool for elegant application.
Melt chocolate in gentle waves, stirring between short bursts. Dunk each cookie into the glossy chocolate, letting excess drip away. Rest on parchment until the chocolate sets into a perfect, shiny shell.
Tips for Tweaking Tagalong Cookie Recipes
Serving Ideas for Tagalong Cookies
Keeping Tagalong Cookies Fresh Longer
Print
Homemade Tagalong Cookies Recipe
- Total Time: 1 hour 15 minutes
- Yield: 22 1x
Description
Homemade tagalong cookies deliver a classic Girl Scout favorite with crisp shortbread, creamy peanut butter, and smooth chocolate coating. Chocolate lovers and baking enthusiasts can easily recreate this delightful treat in their own kitchen.
Ingredients
- 2.5 cups (350 g / 12.35 oz) all-purpose flour
- 1 cup (226 g / 8 oz) unsalted butter, room temperature
- 2 large egg yolks
- 6 tbsps unsalted butter, room temperature
- ⅔ cup (126 g / 4.4 oz) granulated sugar
- 1.25 cups creamy peanut butter
- 1.25 cups powdered sugar, sifted
- 3 bags (10 oz each) Ghirardelli dark chocolate melting wafers
- 2 tsps (10 mL / 0.33 fl oz) pure vanilla extract
- 1 tsp pure vanilla extract
- 0.5 tsp salt
Instructions
- Dough Preparation: Cream butter and sugar in a stand mixer until light and fluffy. Blend in egg yolks and vanilla extract until smooth.
- Dry Ingredient Integration: Fold flour and salt into the mixture, creating a cohesive dough. Divide into two equal logs, wrap in plastic, and refrigerate for 45 minutes to firm up.
- Baking Setup: Preheat oven to 350°F. Line a baking sheet with a silicone mat or parchment paper.
- Cookie Shaping: Slice chilled dough logs into quarter-inch rounds. Arrange on prepared baking sheet with slight spacing.
- Baking Process: Bake for 11-13 minutes until edges turn golden. Transfer to a wire rack and cool completely.
- Filling Creation: Whip butter and peanut butter until smooth. Incorporate powdered sugar and vanilla, mixing to a creamy consistency.
- Filling Application: Pipe peanut butter filling onto cookie centers. Briefly chill to set the layer.
- Chocolate Coating: Melt chocolate in a microwave-safe bowl, stirring to prevent burning. Dip each filled cookie, ensuring complete coverage.
- Finishing Touch: Tap off excess chocolate and place on parchment paper. Allow chocolate to set at room temperature or refrigerate to expedite.
Notes
- Chill Dough Strategically: Refrigerate logs for at least 45 minutes to enhance flavor development and prevent spreading during baking.
- Slice Evenly: Use a sharp knife to cut cookie rounds precisely quarter-inch thick, ensuring uniform baking and consistent texture.
- Control Chocolate Melting: Microwave chocolate in short intervals, stirring frequently to prevent burning and achieve smooth, glossy coating.
- Handle with Care: Allow cookies to cool completely before filling and coating to maintain structural integrity and prevent filling from melting.
- Prep Time: 15 minutes
- Cook Time: 13 minutes
- Category: Desserts, Snacks
- Method: Baking
- Cuisine: American
Nutrition
- Serving Size: 22
- Calories: 285
- Sugar: 14g
- Sodium: 75mg
- Fat: 19g
- Saturated Fat: 10g
- Unsaturated Fat: 9g
- Trans Fat: 0g
- Carbohydrates: 26g
- Fiber: 1g
- Protein: 4g
- Cholesterol: 37mg
Mia Reynolds
Food Writer & Home Cooking Specialist
Expertise
Easy Home Baking, Recipe Writing and Storytelling, Local and Seasonal Ingredients, Baking for Beginners
Education
New England Culinary Institute (NECI), Montpelier, Vermont
Community College of Vermont, Winooski, Vermont
Mia Reynolds fell in love with baking as a teenager experimenting in her family kitchen. Her passion took her to New England Culinary Institute, where she learned practical pastry techniques, and later to Community College of Vermont to deepen her understanding of food management.
Mia combines clear, simple baking instructions with heartwarming stories, making home baking approachable for everyone.