Easy Homemade Devil Dogs Recipe: Nostalgic Chocolate Bliss
Devil Dogs spark memories of childhood treats that dance between decadent chocolate and nostalgic sweetness.
These classic snack cakes carry a mischievous reputation for intense flavor and irresistible texture.
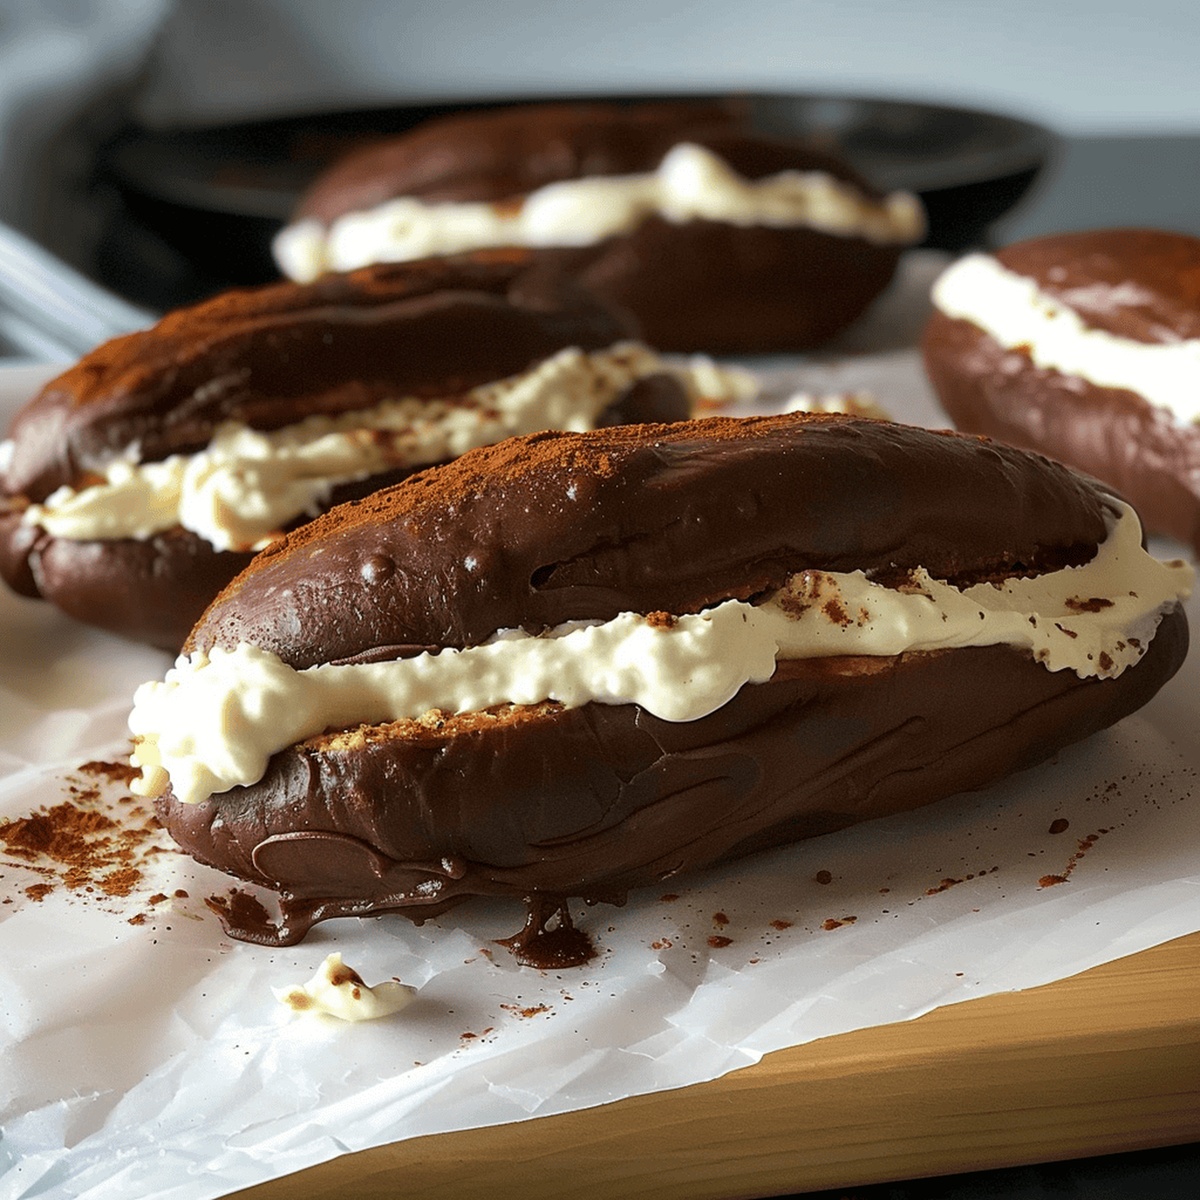
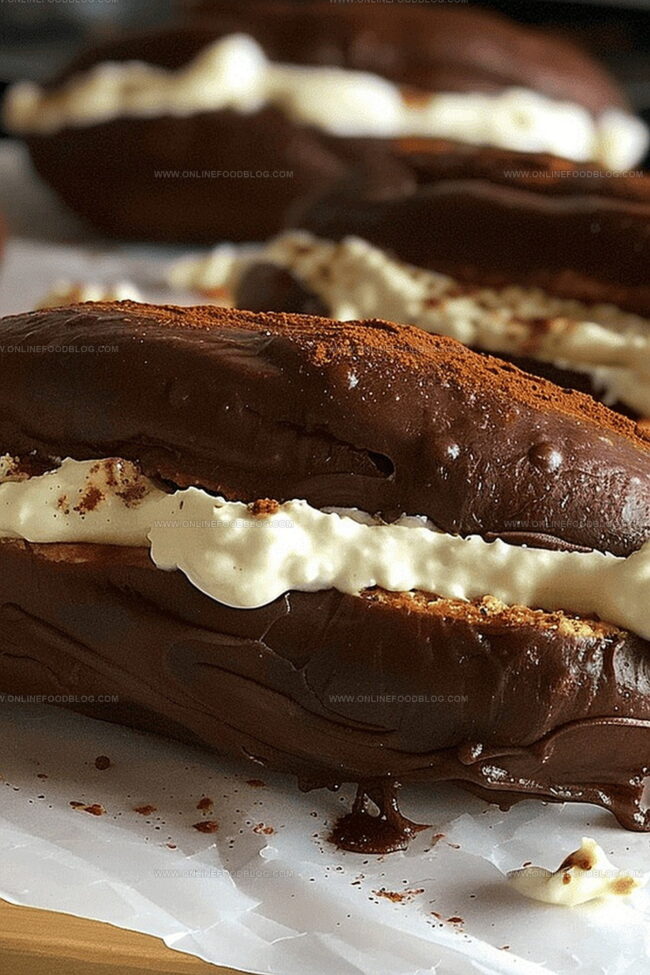
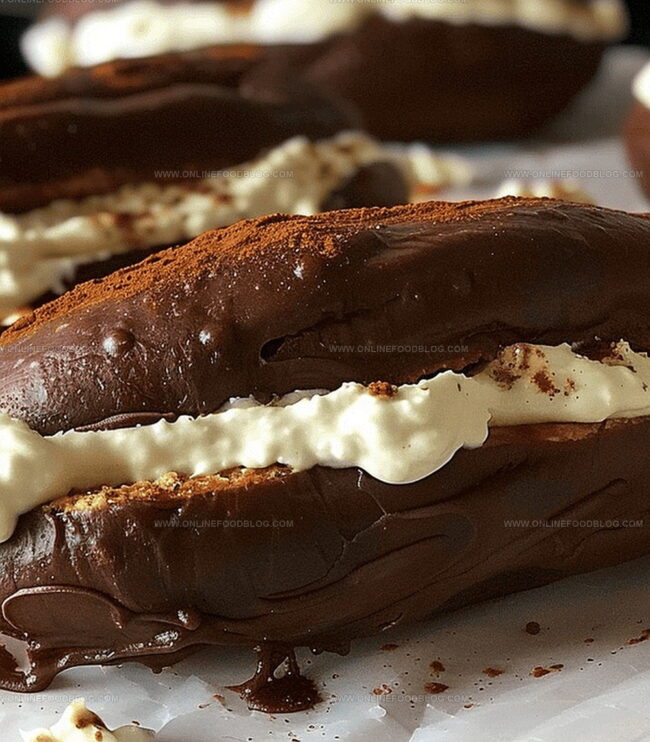
Soft, pillowy cake layers sandwich a creamy filling that promises pure indulgence.
Rich chocolate notes blend seamlessly with a light, airy cream that melts instantly on your tongue.
Home bakers can recreate this beloved dessert with simple ingredients and minimal culinary expertise.
Each bite delivers a perfect balance of moisture and richness that transports you back to simpler times.
Prepare to revamp your kitchen into a delightful bakery that rivals any store-bought confection.
Why Devil Dogs Deserve a Comeback
Ingredients to Make These at Home
Cake Base Ingredients:Wet Ingredients:Filling Ingredients:Assembling Classic Cream-Filled Devil Dogs
Step 1: Prepare Baking Setup
Warm up the oven to 425°F. Cover baking sheets with parchment paper.
Step 2: Mix Dry Ingredients
Sift together in a large bowl:Set the mixture aside.
Step 3: Create Cake Batter
In a separate bowl, whip butter and sugar until fluffy (about 5 minutes). Add egg and vanilla. Gradually mix dry ingredients and milk, alternating between them and starting/ending with dry ingredients.
Step 4: Pipe Cake Batter
Transfer batter into a zippered plastic bag. Cut 1/2-inch corner and pipe 3-inch logs onto prepared baking sheets.
Step 5: Bake Cake Logs
Bake for 8 minutes until set. Cool on wire racks.
Step 6: Prepare Flour Paste
In a saucepan over medium-low heat, whisk:Cook until mixture becomes thick paste. Let cool slightly.
Step 7: Create Creamy Filling
Beat flour paste with powdered sugar until smooth. In another bowl, cream butter and shortening. Add vanilla and flour mixture. Beat until light and fluffy.
Step 8: Assemble Devil Dogs
Spread filling on flat sides of half the cakes. Top with remaining cake pieces to create sandwiches.
Tips for Soft Cakes and Smooth Filling
Storing Devil Dogs Like a Pro
What to Sip or Serve Alongside
Devil Dog Variations That Hit Differently
Print
Homemade Devil Dogs Recipe
- Total Time: 35 minutes
- Yield: 12 1x
Description
Devil Dogs deliver nostalgic New Jersey bakery magic straight to home kitchens. Classic chocolate cake sandwiches filled with marshmallow cream promise sweet memories and delightful indulgence you’ll savor with each delectable bite.
Ingredients
Main Ingredients:
- ½ cup (120 ml) all-purpose flour
- ½ cup (120 ml) milk
- ½ cup (113 g) unsalted butter
- ½ cup (96 g) shortening
- 1 cup (120 g) powdered sugar
Flavor Enhancers:
- ¼ teaspoon (1.25 ml) salt
- 1 teaspoon (5 ml) vanilla extract
Instructions
- Preheat the oven to 425°F (218°C) and position the oven rack in the middle. Arrange parchment paper on two baking sheets, ensuring complete coverage.
- Sift together all dry ingredients: all-purpose flour, unsweetened cocoa powder, baking soda, ground espresso powder, and kosher salt into a medium mixing bowl. Set aside for later use.
- In a separate large mixing bowl, use an electric mixer to cream unsalted butter and granulated sugar until the mixture becomes light, pale, and exceptionally fluffy, approximately 4-5 minutes.
- Incorporate the whole egg and pure vanilla extract into the butter mixture, blending until fully integrated and smooth.
- Gradually add the dry ingredient mixture and whole milk to the wet ingredients, alternating between the two. Begin and conclude with the dry ingredients, mixing until just combined to maintain the cake’s tender texture.
- Transfer the cake batter into a large resealable plastic bag. Carefully snip a 1/2-inch (1.27 centimeters) opening at one corner to create a piping tool.
- Pipe 3-inch (7.62 centimeters) elongated cake logs onto the prepared baking sheets, spacing them approximately 2 inches apart to allow for potential spreading.
- Bake the cake logs for 7-8 minutes, or until the edges appear set and the centers look slightly soft. Remove from the oven and allow to cool completely on wire cooling racks.
- For the filling, whisk all-purpose flour, whole milk, and a pinch of salt in a medium saucepan over medium-low heat until the mixture becomes completely smooth.
- Continue cooking the flour mixture, stirring constantly, until it transforms into a thick, paste-like consistency. Remove from heat and let cool for 5-7 minutes.
- In a separate mixing bowl, cream unsalted butter and vegetable shortening until well combined and smooth.
- Gradually incorporate powdered sugar, pure vanilla extract, and the cooled flour mixture into the butter combination. Beat with an electric mixer until the filling becomes light, airy, and exceptionally fluffy.
- To assemble the devil dogs, spread a generous layer of filling on the flat side of half the cooled cake logs.
- Gently place the remaining cake logs on top of the filled halves, creating sandwich-like treats. Serve and enjoy immediately or store in an airtight container.
Notes
- Plan ahead by gathering all ingredients and equipment before starting to ensure a smooth baking process.
- Sifting dry ingredients prevents lumps and creates a more uniform, lighter textured cake.
- Use room temperature butter and egg for better mixing and a smoother batter consistency.
- Pipe logs evenly and consistently for uniform devil dogs that bake and look professional.
- Allow cakes and filling to cool completely before assembling to prevent melting and maintain structural integrity.
- Store finished devil dogs in an airtight container at room temperature for up to 3 days, or refrigerate for extended freshness.
- Prep Time: 25 minutes
- Cook Time: 10 minutes
- Category: Desserts, Snacks
- Method: Baking
- Cuisine: American
Nutrition
- Serving Size: 12
- Calories: 180 kcal
- Sugar: 15 g
- Sodium: 50 mg
- Fat: 14 g
- Saturated Fat: 8 g
- Unsaturated Fat: 5 g
- Trans Fat: 0.5 g
- Carbohydrates: 14 g
- Fiber: 0.2 g
- Protein: 1 g
- Cholesterol: 35 mg
Lucas Bennett
Founder & Recipe Creator
Expertise
Simple Everyday Recipes, Sustainable Cooking Practices, Creative Meal Planning, Recipe Testing and Improvement
Education
Fox Valley Technical College, Appleton, Wisconsin
Lake Superior College, Duluth, Minnesota
Lucas Bennett’s cooking journey started in his parents’ kitchen, where he learned to prepare tasty, no-fuss meals from scratch. His culinary passion led him to Fox Valley Technical College, where he gained practical cooking skills.
He then expanded his focus on sustainability at Lake Superior College. Today, Lucas shares easy, approachable recipes designed to make cooking enjoyable and stress-free for everyone.