Fresh Raspberries: Beautiful, fresh garnish that complements cake’s flavor.
Essential Tools to Build a Raspberry Cream Cake
Electric mixer: Perfect for creaming butter, beating eggs, and whipping up smooth frosting.
Two 8-inch round cake pans: Essential for baking even cake layers.
Whisk: Great for combining dry ingredients smoothly.
Large mixing bowls: Needed for mixing cake batter and preparing frosting.
Saucepan: Used for cooking raspberry filling.
Wire cooling racks: Help cakes cool evenly and prevent soggy bottoms.
Toothpick: Checks cake doneness by testing for moist crumbs.
Serving plate: Displays your beautiful finished cake.
Spatula: Helps spread frosting and filling evenly.
Step-by-Step Guide for Assembling Raspberry Cream Cake
Cake Base
Oven Warmup First gather your baking tools and measure out ingredients while the oven heats to a cozy temperature. Prepare cake pans with a light butter coating and gentle flour dusting.
Mixing Magic blend soft butter and sugar until they become fluffy and cloud-like. Add eggs one by one, creating a silky smooth mixture. Fold in flour gently, alternating with milk to create a dreamy batter.
Baking Adventure pour the batter into prepared pans, spreading evenly. Slide into the warm oven and let magic happen. Cake will transform into a golden wonder in about 30 minutes.
Cooling Moment remove cake from oven and let layers rest briefly. Transfer to cooling rack, allowing each layer to reach room temperature naturally.
Raspberry Dream
Filling Creation simmer fresh raspberries with a touch of sweetness. Cook until the mixture thickens and becomes a glossy, vibrant sauce. Let it cool completely.
Creamy Frosting
Smooth Blend whip cream cheese and butter until perfectly smooth. Fold in powdered sugar, creating a luscious, spreadable topping.
Final Assembly
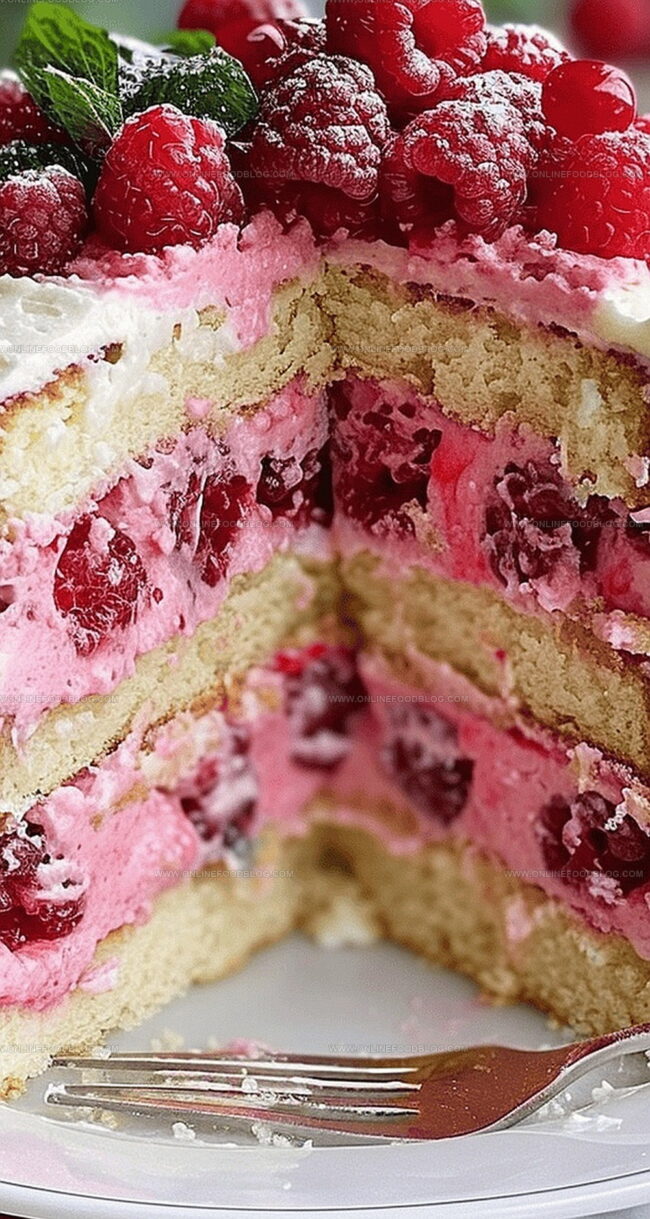
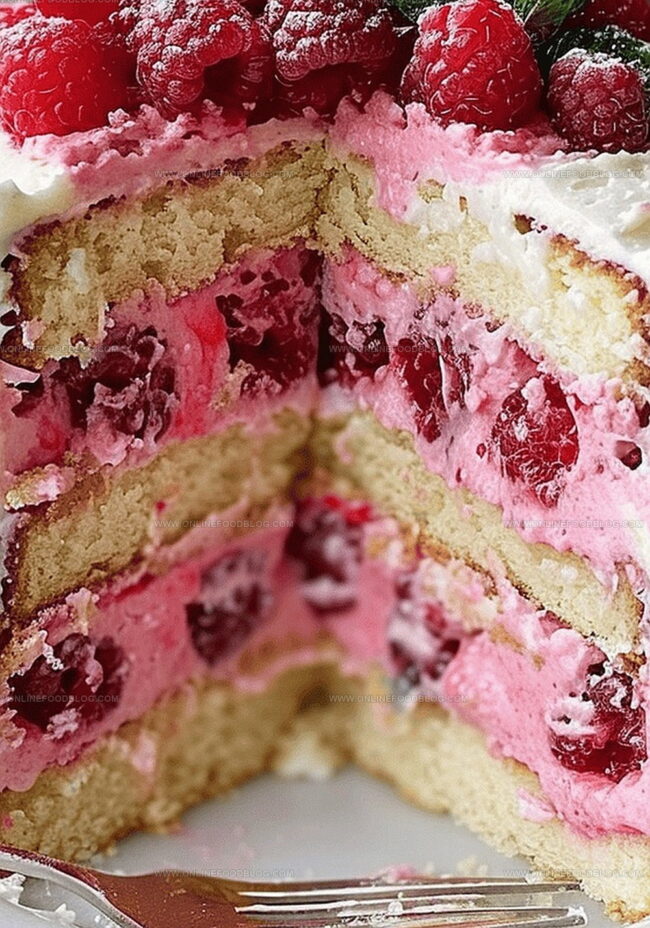
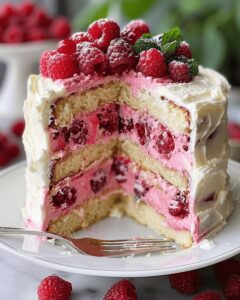
Layer Love place first cake layer on serving plate. Spread cream cheese and drizzle raspberry sauce. Gently add second layer, repeating the delicious process.
Finishing Touch cover entire cake with remaining frosting. Sprinkle fresh raspberries for a stunning presentation.
Flavor Twists to Try in Your Raspberry Cream Cake
Replace raspberries with strawberries or blueberries for a delightful twist on the classic flavor profile.
Use a gluten-free flour blend to transform this cake into a celiac-friendly dessert without compromising taste or texture.
Drizzle homemade raspberry coulis between cake layers for an extra burst of fruity goodness that elevates the entire dessert.
Sprinkle crushed pistachios or toasted almonds around the cake’s base for a crunchy texture and elegant presentation.
Let butter, eggs, and cream cheese sit out for 30 minutes before mixing to create a smoother, more even batter.
Pipe a cream cheese border around cake layers before adding raspberry filling to create a delicious seal.
Refrigerate the assembled cake for 1 hour before serving to help frosting set and make cutting cleaner slices easier.
Ways to Plate and Present Raspberry Cream Cake
Elegant Dessert Centerpiece: Showcase this stunning raspberry cream cake as the star attraction at dinner parties or special celebrations, creating a visual and delectable focal point that wows guests.
Romantic Date Night Treat: Slice this decadent cake into elegant wedges for a romantic dessert shared with your partner, paired with a glass of champagne or sweet dessert wine to elevate the experience.
Summer Picnic Delight: Pack individual cake slices in portable containers for outdoor gatherings, making it a perfect refreshing dessert to enjoy at park picnics or summer family reunions with its fruity and creamy profile.
Tea Time Indulgence: Serve thin slices alongside afternoon tea or coffee, complementing the cake’s delicate raspberry flavors with classic tea selections like Earl Grey or chamomile for a sophisticated sweet break.
Storing Raspberry Cream Cake for Freshness
Refrigerator Storage Strategy: Keep the raspberry cream cake chilled in an airtight container for maximum freshness. Wrap the cake loosely with plastic wrap to prevent moisture loss and protect the delicate frosting from absorbing other refrigerator odors.
Shelf Life Magic: Your delightful cake stays delicious for 3-4 days when stored properly in the refrigerator. Each day, the flavors will continue to meld, creating an even more intense taste experience.
Room Temperature Tips: Allow chilled cake slices to sit at room temperature for 15-20 minutes before serving. This gentle warming helps restore the frosting’s creamy texture and enhances the cake’s overall flavor profile.
Freezing Wisdom: Slice the cake into individual portions before freezing. Wrap each slice tightly in plastic wrap, then place in a freezer-safe container. Frozen cake slices remain tasty for up to 2 months, offering a convenient dessert option for spontaneous sweet cravings.
French pastry chefs elevate the raspberry cream cake with delicate layers of sponge, velvety cream, and fresh berries. Dessert enthusiasts will savor this elegant confection that balances sweet and tangy flavors in each sublime bite.
Ingredients
Scale
4 large eggs
2 cups all-purpose flour
1 cup granulated sugar
½ cup unsalted butter, softened
¾ cup milk (180 ml)
2 tsps baking powder
1 tsp vanilla extract
½ tsp salt
2 cups fresh raspberries
½ cup granulated sugar
1 tbsp cornstarch
¼ cup water (60 ml)
16 oz (454 g) cream cheese, softened
4 cups powdered sugar
½ cup unsalted butter, softened
1 tsp vanilla extract
Additional fresh raspberries for garnish
Instructions
Preparation: Meticulously coat two 8-inch round cake pans with grease and flour. Preheat oven to 350°F (175°C).
Dry Mixture: Whisk flour, baking powder, and salt in a medium bowl until uniformly blended.
Butter Mixture: Cream butter and sugar until light and fluffy. Integrate eggs individually, blending thoroughly after each addition. Fold in vanilla extract to create a smooth base.
Batter Development: Gently fold flour mixture and milk into butter mixture, alternating and ending with flour. Mix just until combined to maintain cake’s delicate texture.
Baking Process: Distribute batter evenly between prepared pans, smoothing surfaces. Bake for 25-30 minutes until a toothpick inserted comes out clean. Rest in pans for 10 minutes, then transfer to wire racks for complete cooling.
Raspberry Filling: Combine raspberries, sugar, cornstarch, and water in a saucepan. Cook over medium heat, stirring constantly until mixture thickens and reaches a rolling boil. Remove from heat, allowing to cool completely while occasionally stirring.
Cream Cheese Frosting: Beat cream cheese and butter until silky. Gradually incorporate powdered sugar and vanilla, whipping until achieving a spreadable consistency.
Assembly: Place first cake layer on serving plate. Spread thin cream cheese layer, then carefully spoon half the raspberry filling. Gently position second cake layer, repeating cream cheese and filling application.
Final Touches: Frost entire cake with remaining cream cheese mixture, creating smooth, even coverage. Elegantly garnish top with fresh raspberries in a decorative pattern.
Notes
Precise Pan Preparation: Grease and flour pans meticulously to prevent cake sticking and ensure easy removal.
Avoid Overmixing Batter: Mix ingredients just until combined to maintain a tender, light cake texture and prevent tough, dense results.
Cool Completely Before Frosting: Allow cake layers to cool entirely to room temperature, preventing frosting from melting and ensuring clean, stable layers.
Thicken Raspberry Filling Carefully: Cook filling until it reaches a precise consistency, stirring constantly to prevent burning and achieve the perfect spreadable texture.
Degree: Certificate in Food and Beverage Management
Focus: Essential knowledge of recipe development, ingredient sourcing, and food business basics.
Mia Reynolds fell in love with baking as a teenager experimenting in her family kitchen. Her passion took her to New England Culinary Institute, where she learned practical pastry techniques, and later to Community College of Vermont to deepen her understanding of food management.
Mia combines clear, simple baking instructions with heartwarming stories, making home baking approachable for everyone.

Mia Reynolds
Food Writer & Home Cooking Specialist
Expertise
Easy Home Baking, Recipe Writing and Storytelling, Local and Seasonal Ingredients, Baking for Beginners
Education
New England Culinary Institute (NECI), Montpelier, Vermont
Community College of Vermont, Winooski, Vermont
Mia Reynolds fell in love with baking as a teenager experimenting in her family kitchen. Her passion took her to New England Culinary Institute, where she learned practical pastry techniques, and later to Community College of Vermont to deepen her understanding of food management.
Mia combines clear, simple baking instructions with heartwarming stories, making home baking approachable for everyone.