Quick & Crispy Beef Chimichangas Recipe: A Family Favorite
Golden crispy beef chimichangas represent a mouthwatering fusion of textures and flavors that dance across your palate with remarkable intensity.
Mexican-inspired cuisine brings incredible depth to this delectable dish that combines savory meat with crisp exterior layers.
Authentic preparation requires careful technique and balanced ingredients that elevate simple components into something extraordinary.
Home cooks appreciate how these delightful parcels reinvent ordinary ground beef into a spectacular meal everyone craves.
Professional chefs understand the delicate art of creating perfectly sealed pockets that maintain juicy interiors while achieving a crackling golden-brown shell.
Regional culinary traditions inspire this incredible recipe that blends robust spices with tender, seasoned meat wrapped in soft tortillas.
Skilled cooking reinvents basic ingredients into a crowd-pleasing sensation that guarantees smiles around the dinner table.
Why These Chimichangas Always Get Requests
What Goes into Crispy Beef Chimichangas
Protein and Filling:Wrap and Base:Sauce Ingredients:How to Make Chimichangas Golden and Crunchy
Step 1: Prep Delicious Beef Filling
Prepare Mexican shredded beef according to the existing recipe. If made ahead, refrigerate in juices and drain before using.
Step 2: Set Up Baking Station
Preheat oven to 400°F. Line a baking sheet with aluminum foil and place a wire rack on top.
Step 3: Craft Your Chimichanga Rolls
For each tortilla, create layers of deliciousness:Roll the tortilla burrito-style, ensuring the seam is facing down on the baking sheet.
Step 4: Create Golden Crispy Exterior
Gently brush each chimichanga with olive oil. Bake for 18-20 minutes until achieving a beautiful golden color. For extra crispiness, broil briefly at the end.
Step 5: Whip Up Creamy Signature Sauce
In a saucepan:Remove from heat and stir in:Season with hot sauce to personal preference.
Step 6: Serve and Enjoy
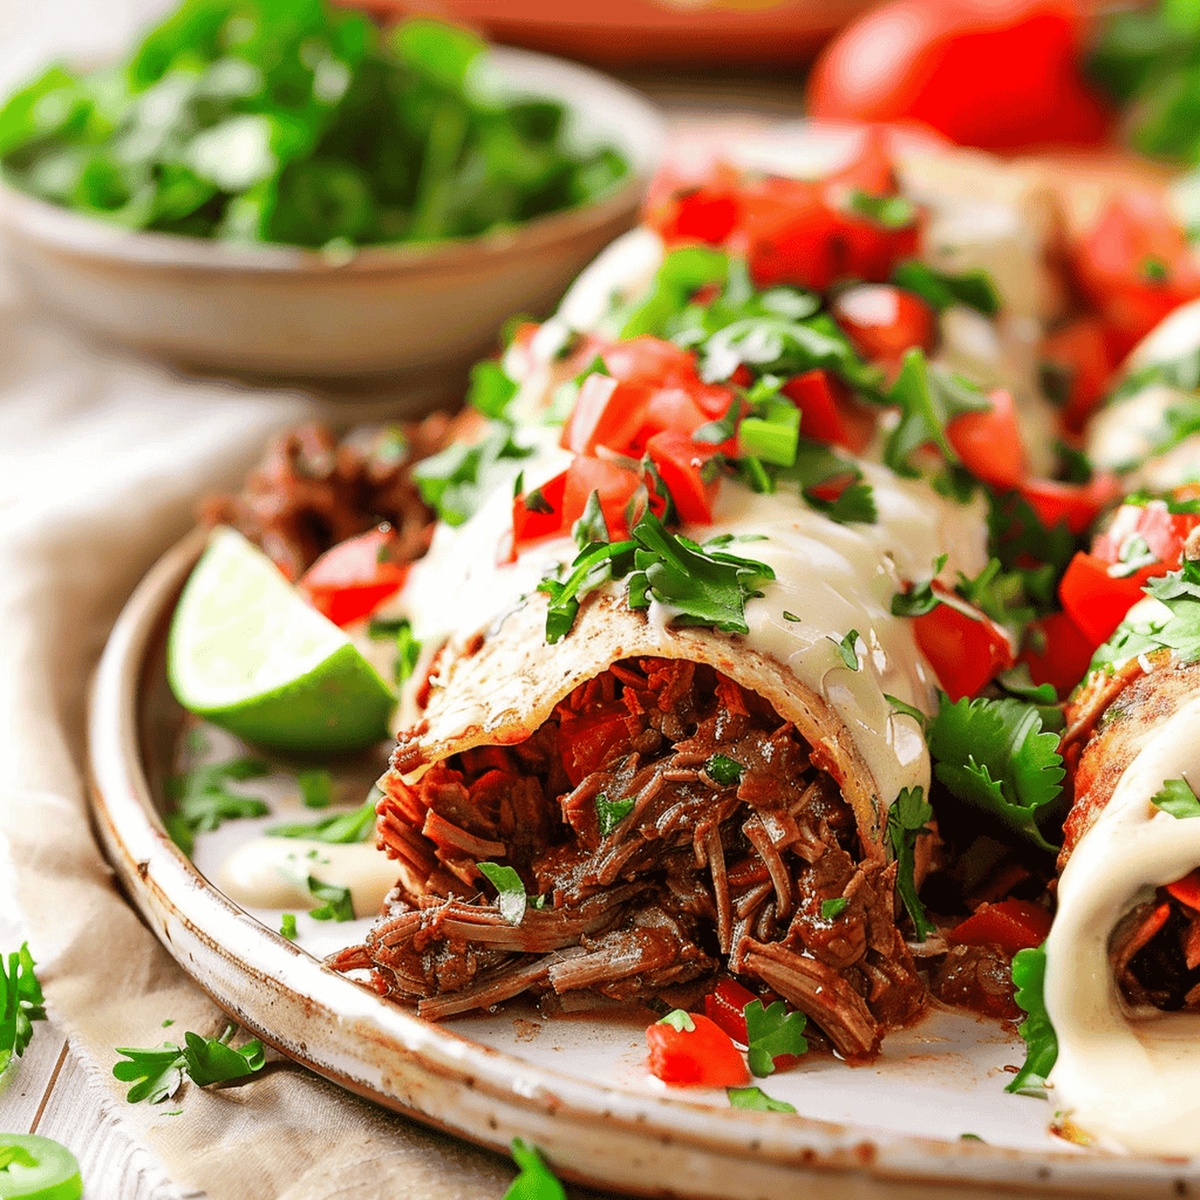
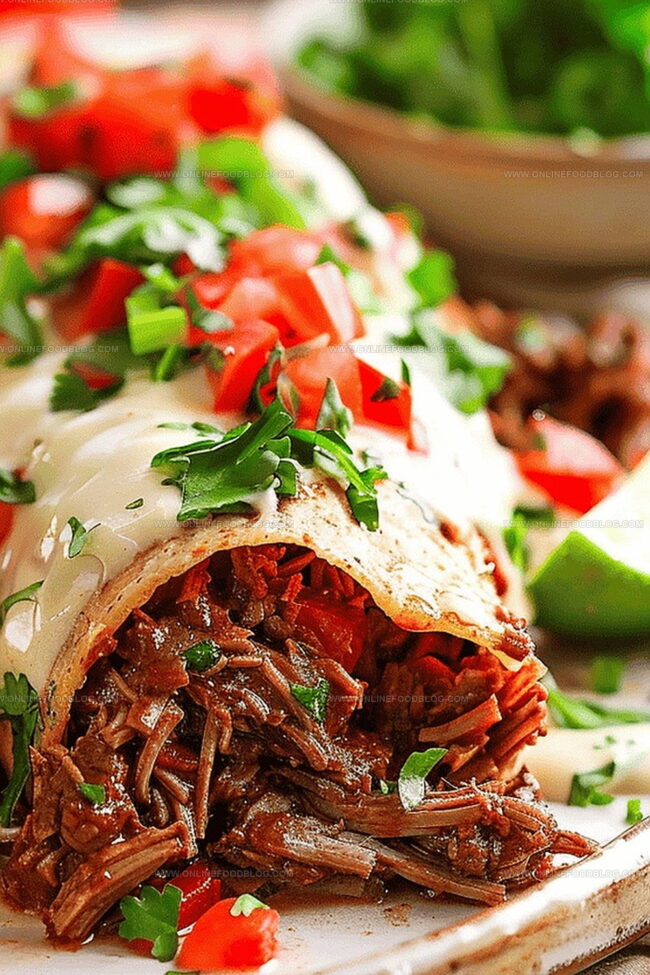
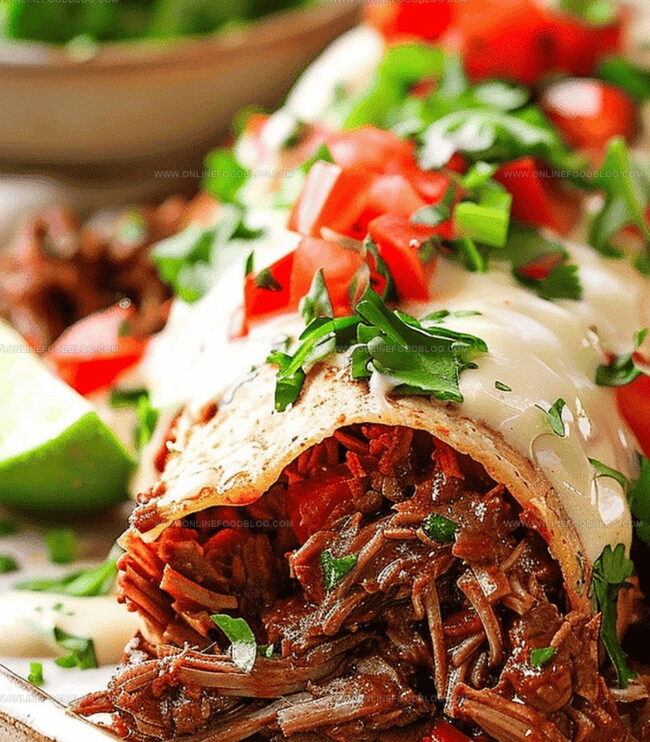
Top chimichangas with the signature sauce and add any desired additional toppings.
Handy Tips for Beef Chimichangas
Storing Crispy Chimichangas Like a Pro
What to Serve with Chimichangas
Bold Chimichanga Flavor Ideas
Print
Golden Crispy Beef Chimichangas Recipe
- Total Time: 40 minutes
- Yield: 6 1x
Description
Sizzling golden chimichangas bring Mexican street flavors straight to your kitchen. Crispy tortillas wrap succulent seasoned beef, promising a delightful crunch you’ll savor with each delectable bite.
Ingredients
Proteins and Fillings:
- 1 recipe Mexican Shredded Beef
- 1 cup freshly shredded sharp cheddar cheese
- ¼ cup cilantro lime rice (optional)
- ¼ cup black or pinto beans (optional)
Base and Wrap:
- 6 burrito-size tortillas (10-inch)
Green Chili Sour Cream Sauce Ingredients:
- 2 tablespoons olive oil
- 1 tablespoon unsalted butter
- 3 tablespoons flour
- 2 cups low sodium chicken broth
- ½ teaspoon cumin
- ½ teaspoon chili powder
- ¼–½ teaspoon salt
- ¼ teaspoon pepper
- ¼ teaspoon garlic powder
- ¼ teaspoon onion powder
- ½ 4-ounce can mild chopped green chilies
- ½ cup shredded sharp cheddar cheese
- ½ cup sour cream
- 1 tablespoon lime juice
- Hot sauce or cayenne pepper to taste
Optional Toppings:
- Pico de gallo
- Guacamole
- Salsa
- Sour cream
- Hot sauce
Instructions
- Preheat the oven to 400°F (204°C) and prepare a baking sheet lined with a wire rack for optimal air circulation.
- Take large flour tortillas and lay them flat on a clean work surface for efficient assembly.
- Spread a thin layer of cooked rice and refried beans in the center of each tortilla, creating a delicious base.
- Distribute approximately of prepared Mexican shredded beef evenly across the tortilla’s center.
- Sprinkle a generous amount of shredded cheese over the beef, ensuring complete coverage.
- Fold the tortilla’s sides inward, then roll tightly from the bottom, creating a compact burrito-like package with sealed edges.
- Place each rolled chimichanga seam-side down on the prepared wire rack to prevent unraveling during baking.
- Gently brush the exterior of each chimichanga with olive oil, promoting a golden and crispy exterior.
- Bake in the preheated oven for 18-20 minutes, rotating the baking sheet halfway through to ensure even browning.
- While baking, prepare the accompanying sauce by melting butter and olive oil in a saucepan over medium heat.
- Whisk in flour and cook for 2 minutes, stirring continuously to prevent burning.
- Gradually pour in broth and spices, stirring until the mixture thickens and becomes smooth.
- Remove the sauce from heat and incorporate chopped green chilies, additional cheese, sour cream, and fresh lime juice.
- Season the sauce with hot sauce to taste, adjusting the heat level as desired.
- Once chimichangas are golden and crisp, remove from the oven and let rest for 2-3 minutes.
- Plate the chimichangas and generously drizzle with the prepared sauce.
- Garnish with optional toppings such as fresh cilantro, diced tomatoes, or additional sour cream.
Notes
- Choose high-quality tortillas that are fresh and pliable for easy rolling without cracking.
- Drain the shredded beef thoroughly to prevent soggy chimichangas and ensure a crispy exterior.
- Brush tortillas generously with olive oil to achieve a golden, crunchy texture during baking.
- Allow the sauce to cool slightly before adding cheese and sour cream to prevent separation.
- Experiment with different cheese varieties like pepper jack or monterey jack for extra flavor complexity.
- Serve immediately after baking to maintain the perfect crispy texture and optimal temperature.
- Prep Time: 20 minutes
- Cook Time: 20 minutes
- Category: Dinner, Appetizer, Snacks
- Method: Baking
- Cuisine: Mexican
Nutrition
- Serving Size: 6
- Calories: 450 kcal
- Sugar: 3 g
- Sodium: 620 mg
- Fat: 28 g
- Saturated Fat: 12 g
- Unsaturated Fat: 12 g
- Trans Fat: 0.5 g
- Carbohydrates: 30 g
- Fiber: 2 g
- Protein: 25 g
- Cholesterol: 95 mg
Lucas Bennett
Founder & Recipe Creator
Expertise
Simple Everyday Recipes, Sustainable Cooking Practices, Creative Meal Planning, Recipe Testing and Improvement
Education
Fox Valley Technical College, Appleton, Wisconsin
Lake Superior College, Duluth, Minnesota
Lucas Bennett’s cooking journey started in his parents’ kitchen, where he learned to prepare tasty, no-fuss meals from scratch. His culinary passion led him to Fox Valley Technical College, where he gained practical cooking skills.
He then expanded his focus on sustainability at Lake Superior College. Today, Lucas shares easy, approachable recipes designed to make cooking enjoyable and stress-free for everyone.