
Zesty Tuna Onigiri Recipe: Spicy Rice Pockets To Go
Sushi enthusiasts and Japanese street food lovers, get ready to dive into a delectable world of homemade spicy tuna onigiri that bursts with flavor and authenticity.
These handheld rice triangles packed with spicy tuna will transport you straight to the bustling streets of Tokyo.
Creating these delightful snacks requires just a few simple ingredients and some basic techniques.
The combination of seasoned sushi rice, zesty spicy tuna filling, and a crisp nori wrap makes these onigiri irresistibly good.
Each bite delivers a perfect balance of heat, umami, and texture that will satisfy your midday hunger or late-night snack cravings.
Rolling these compact rice balls is easier than you might expect, and the results are truly impressive.
Grab your apron and let’s turn your kitchen into a Japanese culinary adventure.
Quick Recipe Overview
Spicy Tuna Onigiri Ingredients Breakdown
For Rice Base:For Filling and Sauce:For Wrapping and Garnish:Tools to Make Spicy Tuna Onigiri at Home
Instructions for Building Spicy Tuna Onigiri
Tuna Rice Treasure
Start with fresh sushi rice, rinsing carefully until water turns crystal clear. Cook the grains until fluffy and tender, then season with a gentle sprinkle of salt. Allow the rice to cool and reach room temperature, creating a perfect canvas for your flavor adventure.
Blend succulent tuna with creamy Japanese mayo and a splash of fiery sriracha. This vibrant mixture will become the zesty core of your delightful rice creation.
Lay out a clean piece of cling film and moisten your rice paddle. Carefully spread a portion of rice into a soft circle, then nestle the spicy tuna mixture right in the center. Use the film’s edges to gently twist and form a smooth ball, ensuring the filling stays snugly inside.
Softly press your rice ball into a disc, then use your thumb and finger to sculpt a charming triangular shape. The goal is a compact, appetizing morsel that fits perfectly in your hand.
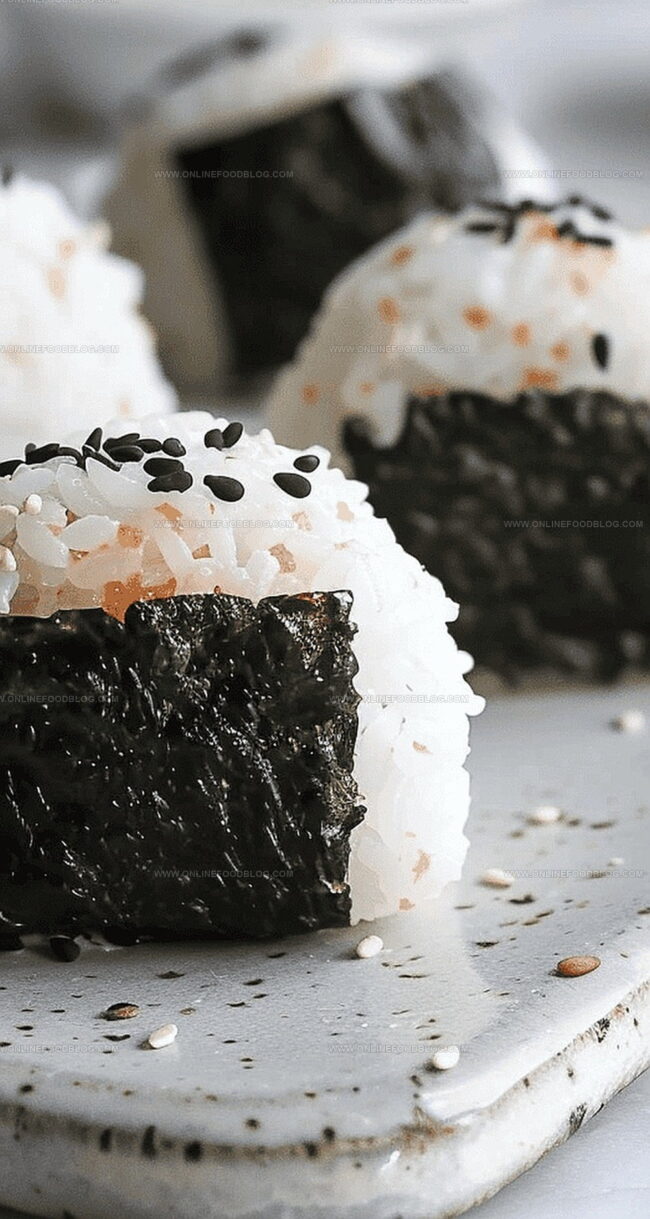
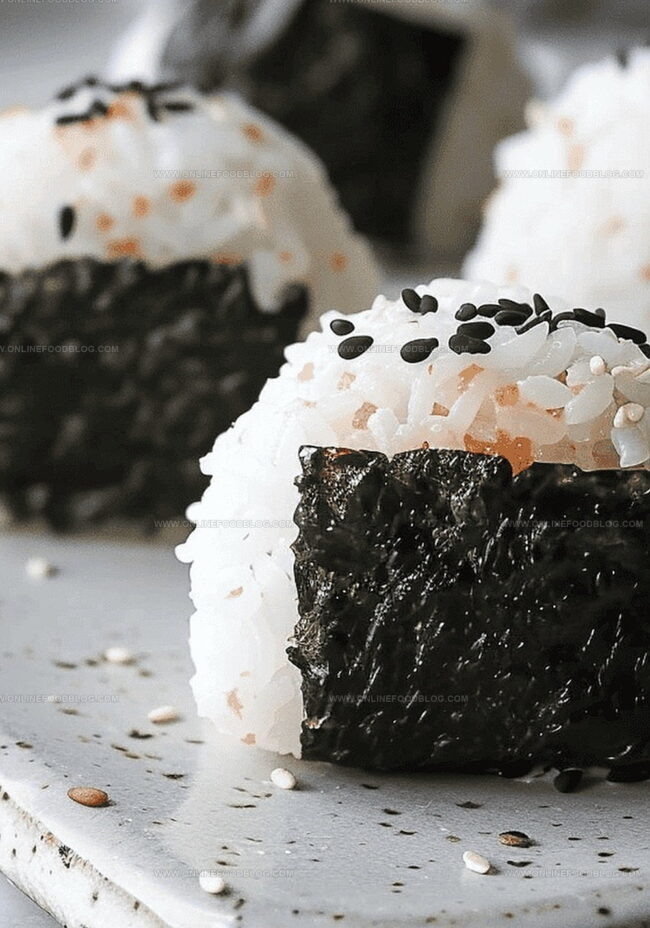
Wrap a delicate strip of nori around the base of each rice triangle, creating a beautiful finishing touch. Sprinkle with black sesame seeds for an extra layer of texture and visual appeal.
Ways to Spice or Customize Your Onigiri
Serving Spicy Tuna Onigiri with Sides
Keeping Spicy Tuna Onigiri Fresh
Print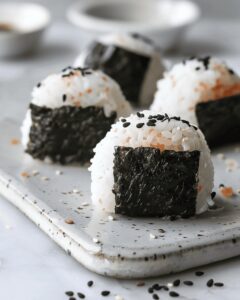
Fiery Tuna Onigiri Recipe
- Total Time: 50 minutes
- Yield: 3 1x
Description
Homemade traditional Japanese spicy tuna onigiri offers a delightful handheld rice experience with complex flavors. Crisp nori wraps around seasoned sushi rice and spicy tuna, creating perfect portable lunch companions for hungry travelers.
Ingredients
- 104 grams (3.7 oz) canned tuna, drained
- 240 grams (1.5 rice cooker cups or 8.5 oz) sushi rice, uncooked
- ½ tbsp Japanese mayo (or regular mayo)
- 1 tsp sriracha sauce
- ½ tsp salt
- ½ or 2 sheets nori (based on personal preference)
- ½ tsp black sesame seeds (optional for garnish)
- Water to moisten hands and rice paddle
Instructions
- Rice Preparation: Rinse sushi rice under cold water until clear, then cook according to package instructions using a rice cooker or pot. Transfer to a large bowl, mix with salt, and let cool to room temperature.
- Tuna Filling Creation: Combine drained tuna with Japanese mayonnaise and sriracha sauce in a mixing bowl, blending thoroughly to create a spicy, creamy mixture.
- Onigiri Assembly: Lay plastic wrap on a clean surface and dampen a rice paddle. Divide cooled rice into equal portions. Place one portion on the wrap, forming a circular layer. Position a spoonful of spicy tuna mixture in the center.
- Shaping Technique: Gather plastic wrap edges, twisting gently to encase the filling completely. Compress into a compact ball, then flatten into a disc. Use fingers to mold into a triangular shape with crisp edges.
- Finishing Touches: Carefully wrap nori strips around the base of each rice triangle. For added visual and textural dimension, sprinkle black sesame seeds over the surface of the onigiri.
Notes
- Master Rice Washing: Rinse sushi rice meticulously until water runs crystal clear, ensuring perfect starch removal for optimal texture and consistency.
- Perfect Rice Cooling Technique: Allow rice to cool naturally at room temperature, preventing moisture buildup and maintaining ideal sticky rice structure.
- Strategic Filling Placement: Center the spicy tuna mixture precisely to create a balanced, flavorful core that distributes evenly when biting into the onigiri.
- Nori Wrapping Pro Tip: Cut nori strips carefully to create a neat, secure base that enhances grip and prevents rice from falling apart while eating.
- Prep Time: 20 minutes
- Cook Time: 30 minutes
- Category: Lunch, Snacks
- Method: Blending
- Cuisine: Japanese
Nutrition
- Serving Size: 3
- Calories: 270
- Sugar: 1g
- Sodium: 350mg
- Fat: 9g
- Saturated Fat: 1.5g
- Unsaturated Fat: 7g
- Trans Fat: 0g
- Carbohydrates: 38g
- Fiber: 1g
- Protein: 13g
- Cholesterol: 30mg
Mia Reynolds
Food Writer & Home Cooking Specialist
Expertise
Easy Home Baking, Recipe Writing and Storytelling, Local and Seasonal Ingredients, Baking for Beginners
Education
New England Culinary Institute (NECI), Montpelier, Vermont
Community College of Vermont, Winooski, Vermont
Mia Reynolds fell in love with baking as a teenager experimenting in her family kitchen. Her passion took her to New England Culinary Institute, where she learned practical pastry techniques, and later to Community College of Vermont to deepen her understanding of food management.
Mia combines clear, simple baking instructions with heartwarming stories, making home baking approachable for everyone.