
Easy Festive Green Mint Cookies Recipe: Irresistible Holiday Joy
Mint-infused cookies bring a refreshing twist to classic holiday treats, enhanceing ordinary baking into a delightful sensory experience.
These delectable sweets capture the essence of cool, crisp flavors that dance across your palate.
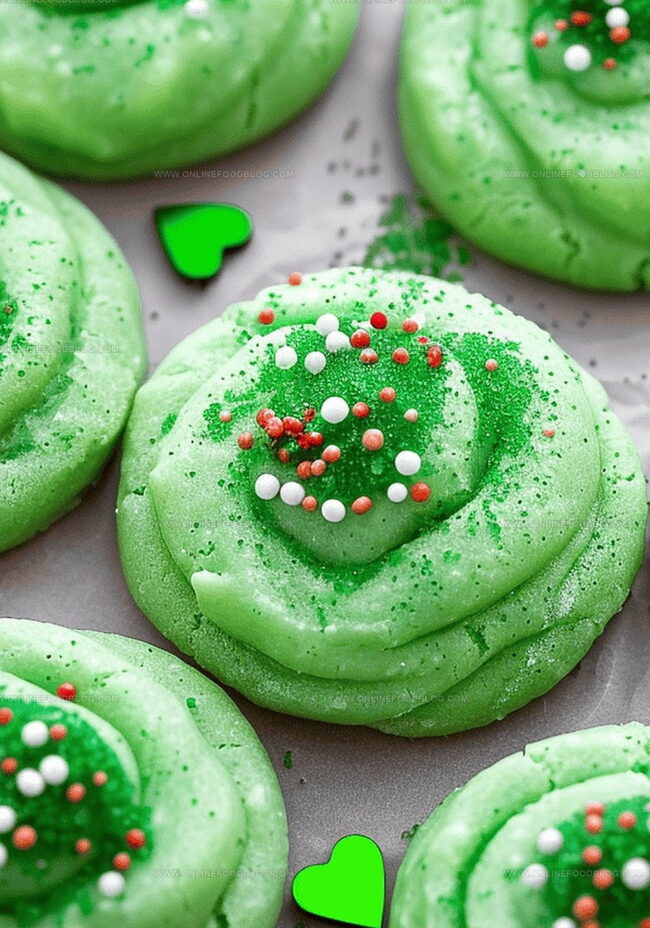
Soft, pillowy textures combine with vibrant green hues to create an irresistible dessert that looks as amazing as it tastes.
Delicate peppermint notes weave through each bite, offering a perfect balance of sweetness and cooling sensation.
Seasonal gatherings become more memorable when you introduce these charming little morsels to your dessert table.
Elegant yet playful, these cookies represent a modern approach to traditional holiday baking.
You’ll find yourself enchanted by their delightful appearance and sophisticated flavor profile.
Festive Green Mint Cookies for the Holidays

Ingredients for Festive Green Mint Cookies
Dry Ingredients:Wet Ingredients:Filling and Decoration:How to Make Festive Green Mint Cookies
Step 1: Prepare Dry Ingredients
Grab a medium bowl and sift together flour, baking soda, baking powder, and salt. Set this mixture aside for later use.
Step 2: Create Wet Mixture
In a large bowl, blend melted butter, sugar, vanilla extract, egg, and a few drops of green food dye. Whisk until the mixture looks smooth and vibrant green.
Step 3: Combine Mixtures
Gently fold the dry ingredients into the wet mixture using a rubber spatula. Mix just until everything is combined – don’t overmix!
Step 4: Prepare Baking Setup
Preheat the oven to 350°F. Line 2 cookie sheets with parchment paper. While the oven heats, prepare Andes mints:Step 5: Shape Cookie Dough
Use a 1-tablespoon cookie scoop to portion dough. Create a small thumb indent in each dough ball.
Step 6: Add Mint Filling
Fill the indent with chopped mint pieces. Carefully fold dough over to cover the mint completely.
Step 7: Coat and Arrange Cookies
Roll each cookie dough ball in green sugar, ensuring full coverage. Place cookies 2 inches apart on prepared baking sheets.
Step 8: Bake Cookies
Bake for 8-10 minutes until cookies are just set. Immediately after removing from oven, gently press a heart sprinkle on top of each warm cookie.
Step 9: Cool and Enjoy
Transfer cookies to a wire rack. Allow them to cool completely before serving or storing.
Top Tips for Festive Green Mint Cookies
Storing and Reheating Festive Green Mint Cookies
Pairing Festive Green Mint Cookies with Coffee
Festive Green Mint Cookies Variations You’ll Love
Print
Festive Green Mint Cookies Recipe
- Total Time: 30 minutes
- Yield: 24 1x
Description
Festive Green Mint Cookies bring holiday cheer with their vibrant emerald hue and cool peppermint essence. Delicate yet indulgent, these cookies melt in your mouth, offering a perfect balance of sweetness and refreshing mint that will transport guests to winter wonderland celebrations.
Ingredients
Main Ingredients:
- 1 ⅓ cups (170 grams) all-purpose flour
- ½ cup (113 grams) unsalted butter, melted and cooled
- ¾ cup (150 grams) white granulated sugar
- 1 large egg, room temperature
Leavening and Seasoning Ingredients:
- ¼ teaspoon baking soda
- ¼ teaspoon baking powder
- ½ teaspoon salt
Decorative and Flavor Enhancers:
- 1 teaspoon pure vanilla extract
- 17 Andes mints, chopped
- 16 jumbo heart sprinkles
- Green gel food dye (a few drops)
- Green sugar for rolling the cookies
Instructions
- Prepare the dry mixture by meticulously sifting flour, baking soda, baking powder, and salt into a medium bowl, then set aside for future incorporation.
- In a large mixing bowl, combine melted butter, granulated sugar, pure vanilla extract, a single large egg, and a few drops of vibrant green food coloring. Whisk thoroughly until the mixture achieves a uniform, smooth consistency.
- Gently fold the previously sifted dry ingredients into the wet mixture using a flexible rubber spatula, blending until just combined to prevent overmixing.
- Preheat the oven to 350°F (175°C) and line two baking sheets with parchment paper. While the oven reaches temperature, let the dough rest and finely chop Andes mint chocolates into small, even pieces.
- Utilize a 1-tablespoon (15 milliliters) cookie scoop to portion the dough. Create a small indentation in each dough ball using your thumb, forming a pocket for mint filling.
- Carefully place chopped mint pieces into the indentation, then delicately fold the dough over to completely encase the chocolate fragments.
- Roll each cookie dough ball generously in green decorative sugar, ensuring full and even coverage. Position the coated cookies on prepared baking sheets, spacing them approximately 2 inches (5 centimeters) apart to accommodate potential spreading.
- Bake in the preheated oven for 8-10 minutes, watching carefully until cookies are just set but not overcooked.
- Immediately after removing from the oven, while cookies remain warm, gently press a decorative heart-shaped sprinkle onto the center of each cookie.
- Transfer the freshly baked cookies to a wire cooling rack, allowing them to cool completely and reach optimal texture.
Notes
- Quick Mint Infusion: Chop Andes mints before starting to streamline your baking process and ensure smooth cookie preparation.
- Sugar Coating Trick: Roll cookies in green sugar for a festive touch that adds sparkle and extra sweetness to each bite.
- Thumb Indent Technique: Create a small well in each cookie dough ball to perfectly nestle chopped mint pieces inside.
- Baking Precision: Watch cookies closely and remove from oven at 8-10 minutes when edges are just set to maintain soft, chewy texture.
- Decorative Finishing: Press heart sprinkles onto warm cookies immediately after baking for a cute, personalized touch that sets while cooling.
- Cooling Wisdom: Allow cookies to cool completely on a wire rack to help them firm up and develop their ideal texture.
- Prep Time: 20 minutes
- Cook Time: 10 minutes
- Category: Desserts, Snacks
- Method: Baking
- Cuisine: American
Nutrition
- Serving Size: 24
- Calories: 95 kcal
- Sugar: 7 g
- Sodium: 65 mg
- Fat: 5 g
- Saturated Fat: 3 g
- Unsaturated Fat: 1.5 g
- Trans Fat: 0.1 g
- Carbohydrates: 12 g
- Fiber: 0.2 g
- Protein: 1 g
- Cholesterol: 15 mg
Lucas Bennett
Founder & Recipe Creator
Expertise
Simple Everyday Recipes, Sustainable Cooking Practices, Creative Meal Planning, Recipe Testing and Improvement
Education
Fox Valley Technical College, Appleton, Wisconsin
Lake Superior College, Duluth, Minnesota
Lucas Bennett’s cooking journey started in his parents’ kitchen, where he learned to prepare tasty, no-fuss meals from scratch. His culinary passion led him to Fox Valley Technical College, where he gained practical cooking skills.
He then expanded his focus on sustainability at Lake Superior College. Today, Lucas shares easy, approachable recipes designed to make cooking enjoyable and stress-free for everyone.