Dreamy Homemade Bottom Cupcakes Recipe

Whip Up Fluffy Homemade Bottom Cupcakes Recipe Today

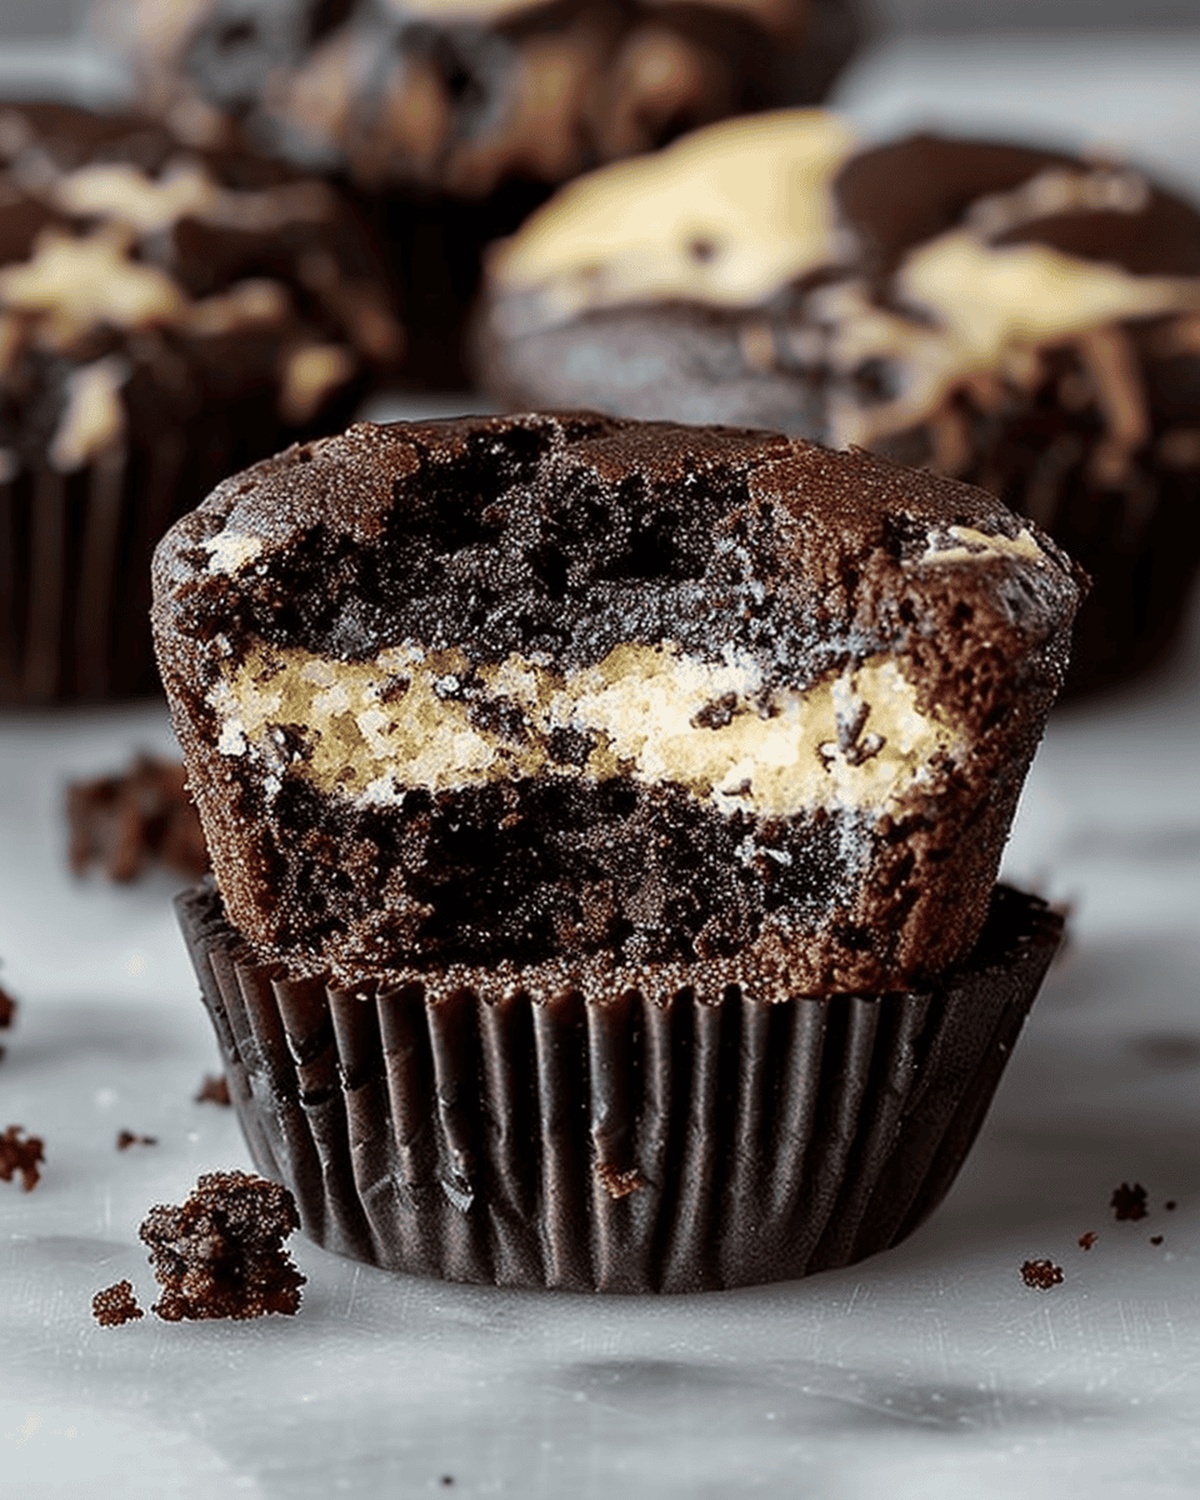
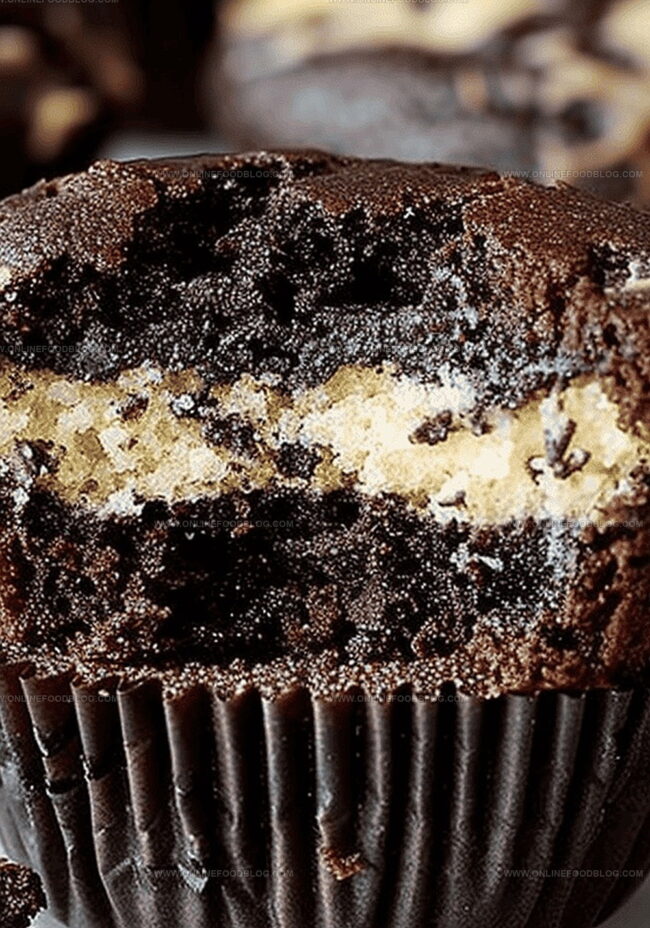
Decadent chocolate bottom cupcakes deliver a delightful surprise with every bite.

Rich, moist layers create a dessert that instantly captivates your senses.

Chocolate lovers will swoon over this irresistible treat that combines classic flavors in a clever way.

Each cupcake promises a luxurious experience that starts with a perfect chocolate base.

The contrast between the tender cake and creamy frosting makes these cupcakes truly special.

Bakers of all skill levels can master this straightforward recipe that turns ordinary ingredients into an extraordinary dessert.

Get ready to impress everyone with these delectable cupcakes that are sure to become a new favorite.

Quick Recipe Overview

Prep Time: 30 minutes

Cook Time: 25 minutes

Total Time: 55 minutes

Calories: 230 kcal

Servings: 13

Homemade Bottom Cupcakes: What Goes In

For Creamy Cheesecake Filling:
  • Cream Cheese: Silky base that provides rich, tangy texture and creates dreamy filling.
  • Vanilla Extract: Adds warm, comforting aroma and deepens overall flavor profile.
  • Granulated Sugar: Sweetens and balances cream cheese's tanginess.
  • Large Eggs: Binds ingredients and provides structure to the filling.
  • Kosher Salt: Enhances and brightens other ingredient flavors.
  • Mini Chocolate Chips: Introduces delightful chocolate bursts and texture contrast.
For Chocolate Cake Base:
  • All-Purpose Flour: Fundamental structure for tender, soft cupcake crumb.
  • Unsweetened Cocoa Powder: Delivers intense, deep chocolate flavor.
  • Granulated Sugar: Provides sweetness and helps achieve moist texture.
  • Baking Powder, Baking Soda: Crucial leavening agents for light, fluffy cake.
  • Kosher Salt: Balances sweetness and intensifies chocolate notes.
For Liquid Ingredients:
  • Milk: Adds moisture and helps create smooth, tender cake texture.
  • Canola or Vegetable Oil: Ensures cupcakes remain incredibly moist.
  • Hot Water: Helps bloom cocoa powder and create deeper chocolate flavor.
  • Apple Cider or White Vinegar: Activates leavening agents for better rise.
  • Vanilla Extract: Rounds out and enhances overall flavor complexity.

Baking Tools for Perfect Homemade Bottom Cupcakes

Equipment & Tools:
  • Stand mixer or electric hand mixer: Essential for whipping cream cheese and mixing batter smoothly.
  • Large mixing bowl: Helpful for combining dry and wet ingredients.
  • Paddle attachment: Perfect for creaming cream cheese and blending batters.
  • Rubber spatula: Great for scraping down bowl sides and ensuring ingredients mix evenly.
  • Muffin pan: Standard 12-well pan for baking cupcakes.
  • Paper liners: Prevents sticking and makes cupcake removal easy.
  • Small saucepan: Used for heating water.
  • Whisk: Ideal for combining dry ingredients and creating smooth batter.
  • Measuring cups and spoons: Ensures precise ingredient quantities.
  • Toothpick: Helps check cupcake doneness.
  • Wire rack: Allows cupcakes to cool completely after baking.

How to Bake Moist Homemade Bottom Cupcakes

  • Cream Cheese Preparation

Soften cream cheese at room temperature for half an hour. Get mixing equipment ready.

  • Cream Cheese Mixture

Blend cream cheese with vanilla until fluffy. Add sugar, egg, and salt. Mix in chocolate chips gently.

  • Dry Ingredient Blend

Combine flour, sugar, cocoa powder, baking powder, and baking soda in a bowl. Whisk thoroughly to eliminate any lumps.

  • Liquid Components

Create a thin batter by mixing milk, oil, vinegar, egg, and vanilla. Pour hot water into mixture and stir until smooth.

  • Cupcake Assembly

Fill muffin pan with batter, leaving space at the top. Add cream cheese dollops onto each cupcake.

  • Baking Process

Place pan in preheated oven. Bake until toothpick comes out clean, approximately 25 minutes.

  • Cooling Stage

Allow cupcakes to rest in pan for ten minutes. Transfer to wire rack for complete cooling.

Flavor Enhancements for Homemade Bottom Cupcakes

  • Create picture-perfect swirls by using a toothpick to gently drag the cream cheese mixture through the chocolate batter in decorative patterns.
  • Prepare the cupcake batter and cream cheese mixture separately up to 24 hours in advance, storing them covered in the refrigerator for convenient baking.
  • Experiment with different chocolate chip varieties like dark chocolate, white chocolate, or butterscotch chips to add unique flavor dimensions to the cream cheese filling.
  • Keep these cupcakes fresh by storing them in an airtight container at room temperature for up to 3 days, or refrigerate for extended freshness up to 5 days. Bring to room temperature before serving for the best taste and texture.
  • Swap all-purpose flour with a gluten-free flour blend to make these cupcakes suitable for those with gluten sensitivities, ensuring everyone can enjoy this delightful treat.

Serving Homemade Bottom Cupcakes at Their Best

  • Chocolate Chip Cream Cheese Companion: Pair these delightful cupcakes with a cold glass of milk or creamy vanilla latte for a perfect sweet moment.
  • Party Platter Perfection: Arrange cupcakes on a decorative tray with fresh berries or mint leaves for an elegant dessert display that will impress guests.
  • Decadent Dessert Upgrade: Dust the cooled cupcakes with powdered sugar or drizzle melted dark chocolate on top to enhance their rich flavor and visual appeal.
  • Gifting Gourmet Treat: Package individual cupcakes in clear gift boxes with a ribbon for a thoughtful homemade present that shows extra care and love.

Storage Plan for Homemade Bottom Cupcakes

  • Fridge Freshness Strategy: Store these delightful cupcakes in an airtight container in the refrigerator for up to 4 days, ensuring maximum flavor and texture preservation.
  • Cool-Down Protocol: Allow cupcakes to reach room temperature before serving to experience their full, rich taste and soft, tender crumb.
  • Make-Ahead Magic: Prepare the cream cheese topping and chocolate batter separately up to 24 hours in advance, keeping them covered in the refrigerator for convenient baking.
  • Freezer-Friendly Approach: Wrap individual cupcakes tightly in plastic wrap, then place in a freezer-safe container. They'll stay delicious for up to 2 months when properly sealed, ready to thaw at a moment's notice for unexpected sweet cravings.
Print
clock clock iconcutlery cutlery iconflag flag iconfolder folder iconinstagram instagram iconpinterest pinterest iconfacebook facebook iconprint print iconsquares squares iconheart heart iconheart solid heart solid icon
Dreamy Homemade Bottom Cupcakes Recipe

Dreamy Homemade Bottom Cupcakes


5 Stars 4 Stars 3 Stars 2 Stars 1 Star

4.5 from 20 reviews

  • Total Time: 55 minutes
  • Yield: 13 1x

Description

Sweet raspberry chocolate cupcakes blend rich cocoa with tangy berry notes in a delightful dessert. Chocolate lovers will savor this elegant treat that balances intense flavors with creamy smooth textures.


Ingredients

Scale
  • 8 oz (226 g) cream cheese
  • 2 large eggs
  • ½ cup whole or 2% milk
  • ¾ cup all-purpose flour
  • ½ cup unsweetened natural cocoa powder
  • ¾ cup granulated sugar
  • ⅓ cup granulated sugar
  • ½ cup mini semisweet chocolate chips
  • ¼ cup canola or vegetable oil
  • ½ cup water
  • 2 tsps vanilla extract
  • 2 tsps apple cider or distilled white vinegar
  • ¾ tsp baking powder
  • ¾ tsp baking soda
  • ¾ tsp kosher salt

Instructions

  1. Preparation: Remove cream cheese from refrigerator and allow to soften at room temperature for 30 minutes. Preheat oven to 350°F with rack positioned in middle position.
  2. Cream Cheese Mixture: Whip cream cheese with vanilla extract until light and fluffy. Incorporate sugar, egg, and salt, beating until smooth. Gently fold mini chocolate chips throughout the mixture.
  3. Chocolate Batter Base: In a mixing bowl, combine flour, sugar, cocoa powder, baking powder, baking soda, and salt. Whisk thoroughly to eliminate lumps. Add remaining egg, milk, oil, vinegar, and vanilla extract. Whisk until ingredients are fully integrated.
  4. Liquid Integration: Bring water to a gentle simmer in a small saucepan, then remove from heat. Gradually pour hot water into chocolate batter, whisking continuously to create a smooth, thin consistency.
  5. Cupcake Assembly: Line muffin pan with paper liners. Fill each liner three-quarters full with chocolate batter. Top each cupcake with a generous dollop of cream cheese mixture, distributing evenly.
  6. Baking Process: Transfer muffin pan to preheated oven and bake for 25 minutes, or until a toothpick inserted into center comes out clean. Allow cupcakes to rest in pan for 10 minutes, then transfer to wire rack for complete cooling.

Notes

  • Soften Cream Cheese Strategically: Let cream cheese sit at room temperature for exactly 30 minutes to achieve perfect smooth texture without becoming too warm.
  • Prevent Lumpy Batter: Whisk dry ingredients thoroughly and beat cream cheese mixture carefully to eliminate potential clumps for a silky-smooth consistency.
  • Check Baking Precision: Use a toothpick test to confirm cupcake doneness; clean toothpick indicates perfectly baked chocolate bottoms with creamy cheese tops.
  • Storage Secret: Cool cupcakes completely on wire rack before storing to maintain ideal texture and prevent condensation that could make bottoms soggy.
  • Prep Time: 30 minutes
  • Cook Time: 25 minutes
  • Category: Desserts, Snacks
  • Method: Baking
  • Cuisine: American

Nutrition

  • Serving Size: 13
  • Calories: 230
  • Sugar: 21 g
  • Sodium: 200 mg
  • Fat: 10 g
  • Saturated Fat: 3 g
  • Unsaturated Fat: 7 g
  • Trans Fat: 0 g
  • Carbohydrates: 33 g
  • Fiber: 1 g
  • Protein: 4 g
  • Cholesterol: 50 mg
Mia Reynolds

Mia Reynolds

Food Writer & Home Cooking Specialist

Expertise

Easy Home Baking, Recipe Writing and Storytelling, Local and Seasonal Ingredients, Baking for Beginners

Education

New England Culinary Institute (NECI), Montpelier, Vermont

  • Certificate: Baking and Pastry Arts Certificate
  • Focus: Hands-on baking skills, pastry basics, and creating delicious, approachable baked goods.

Community College of Vermont, Winooski, Vermont

  • Degree: Certificate in Food and Beverage Management
  • Focus: Essential knowledge of recipe development, ingredient sourcing, and food business basics.

Mia Reynolds fell in love with baking as a teenager experimenting in her family kitchen. Her passion took her to New England Culinary Institute, where she learned practical pastry techniques, and later to Community College of Vermont to deepen her understanding of food management.

Mia combines clear, simple baking instructions with heartwarming stories, making home baking approachable for everyone.

Leave a Reply

Your email address will not be published. Required fields are marked *

Recipe rating 5 Stars 4 Stars 3 Stars 2 Stars 1 Star