
Crispy Golden Panko Sesame Chicken Tenders Recipe
Crispy, golden chicken tenders with panko sesame coating promise a delightful twist on classic comfort food.
These tender morsels pack an irresistible crunch that will make your taste buds dance with excitement.
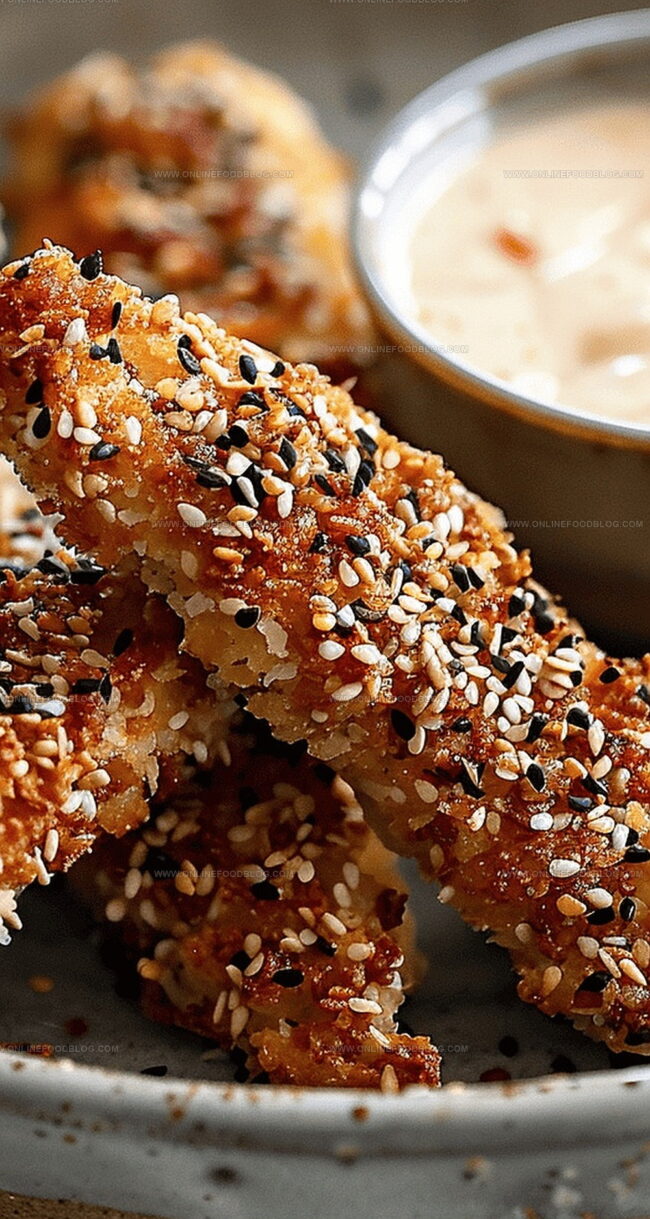
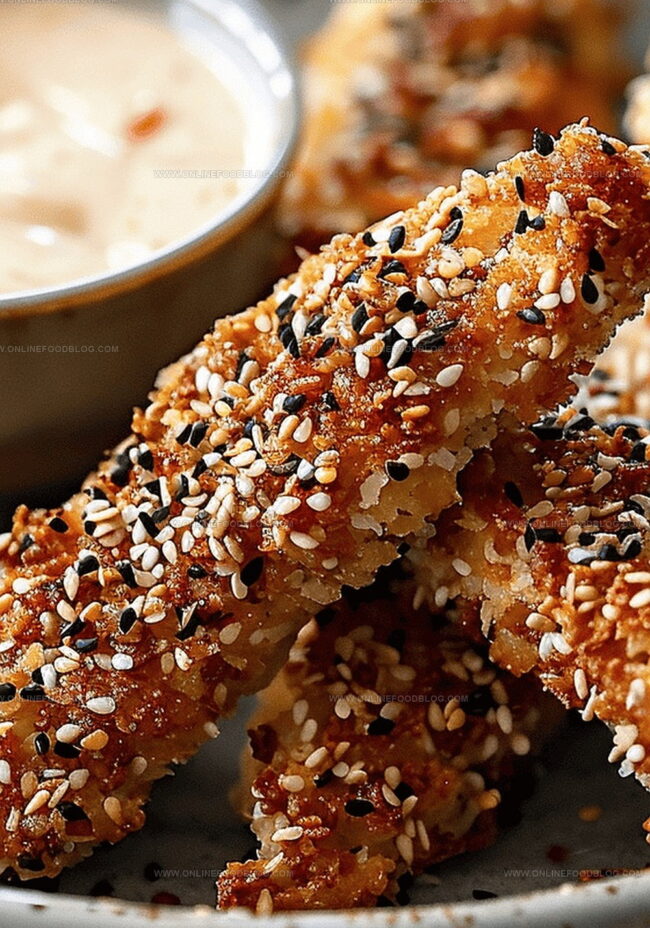
The sesame-infused panko creates a delicate, nutty exterior that perfectly complements the juicy chicken inside.
Restaurants can’t match the homemade magic you’ll achieve with this simple recipe.
Each bite delivers a satisfying blend of textures that elevates weeknight dinners from ordinary to extraordinary.
The secret lies in the perfectly seasoned breading that locks in moisture while creating an irresistibly crisp shell.
Dive into this mouthwatering recipe and transform your dinner into a restaurant-worthy experience.
Quick Recipe Overview
Ingredients in Panko Sesame Chicken Tenders
For Dry Coating:For Wet Coating:For Crispy Coating:For Cooking:For Dipping Sauce:What Tools You’ll Need for Chicken Tenders
Instructions for Panko Sesame Chicken
Create a seasoned flour mixture by adding salt and pepper to a wide bowl.
Whisk an egg with a splash of water in a separate container.
Mix panko breadcrumbs with white and black sesame seeds in another dish.
Coat each chicken tender by first rolling in seasoned flour, then dipping into egg wash, and finally pressing into sesame breadcrumb mixture.
Warm a non-stick skillet over medium-high heat with enough oil to cover bottom of pan.
Carefully place breaded tenders into hot oil, cooking each side for 3-4 minutes until golden brown and internal temperature reaches 165 degrees Fahrenheit.
Transfer cooked tenders to a wire rack placed inside a baking sheet, keeping warm in a low-temperature oven between batches.
Whisk together mayonnaise, minced garlic, lime juice, sriracha, soy sauce, and sesame oil for a zesty accompaniment.
Tips for Making Great Panko Chicken
Serving Your Sesame Chicken Tenders
Storage Tips for Sesame Chicken Tenders
Print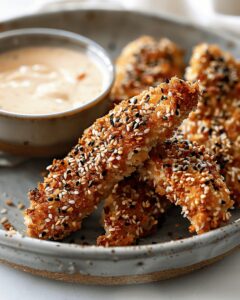
Crispy Panko Sesame Chicken Tenders Recipe
- Total Time: 35 minutes
- Yield: 5 1x
Description
Crispy panko sesame chicken tenders deliver a perfect fusion of Asian-inspired flavors and crunchy textures. Sesame seeds and golden panko breadcrumbs create an irresistible coating that elevates classic chicken tenders into a delightful meal you’ll crave again.
Ingredients
- 1 lb (454 g) chicken tenders
- 1 cup (120 g) panko breadcrumbs
- ½ cup (64 g) sesame seeds
- ½ cup (112 g) mayonnaise
- 3 tbsps (45 g) lime juice
- 1 clove garlic, very finely minced or grated
- 2 tsps sriracha
- 1 tsp soy sauce
- 1 tsp sesame oil
- Water, as needed
Instructions
- Seasoning Preparation: Thoroughly blend salt and pepper into flour mixture within a spacious container, creating a well-distributed seasoning base.
- Coating Station Setup: Establish three distinct zones – seasoned flour, whisked egg wash, and sesame-panko mixture, ensuring each chicken tender can be seamlessly transformed.
- Breading Technique: Systematically coat chicken tenders by first dredging in seasoned flour, removing excess, then immersing completely in egg wash, and finally encrusting with sesame-panko mixture, gently pressing to guarantee full coverage.
- Frying Preparation: Heat non-stick skillet to medium-high temperature, adding oil to create a shallow frying environment approximately 1/4 inch deep, allowing precise heat control.
- Cooking Process: Strategically place breaded tenders into hot oil, maintaining adequate spacing to ensure uniform golden-brown crispiness, frying 3-4 minutes per side until exterior achieves perfect crunch and interior reaches 165 degrees F.
- Resting and Warming: Transfer cooked tenders to wire rack positioned over baking sheet, utilizing low-temperature oven to maintain optimal warmth and texture for subsequent batches.
- Sauce Creation: Whisk mayo, garlic, lime juice, sriracha, soy sauce, and sesame oil into a vibrant, complex dipping sauce, adjusting consistency with water if desired for versatile usage.
- Serving Presentation: Plate hot, crispy tenders alongside dynamically flavored sauce, ensuring maximum sensory enjoyment of crunchy exterior and zesty accompaniment.
Notes
- Prevent Flour Clumping: Sift flour mixture thoroughly to break up any lumps, ensuring an even, smooth coating that sticks perfectly to chicken tenders.
- Optimize Sesame Seed Adherence: Press sesame-panko mixture gently but firmly onto tenders, guaranteeing maximum seed coverage and extra crunch.
- Monitor Oil Temperature: Maintain consistent medium-high heat around 350°F to achieve golden-brown exterior without burning or undercooking chicken.
- Sauce Customization: Adjust sriracha and lime juice quantities to personalize heat level and tanginess according to individual taste preferences.
- Prep Time: 15 minutes
- Cook Time: 20 minutes
- Category: Lunch, Dinner, Snacks
- Method: Frying
- Cuisine: Japanese-American
Nutrition
- Serving Size: 5
- Calories: 430
- Sugar: 2 g
- Sodium: 420 mg
- Fat: 25 g
- Saturated Fat: 4 g
- Unsaturated Fat: 19 g
- Trans Fat: 0 g
- Carbohydrates: 30 g
- Fiber: 1 g
- Protein: 22 g
- Cholesterol: 70 mg
Mia Reynolds
Food Writer & Home Cooking Specialist
Expertise
Easy Home Baking, Recipe Writing and Storytelling, Local and Seasonal Ingredients, Baking for Beginners
Education
New England Culinary Institute (NECI), Montpelier, Vermont
Community College of Vermont, Winooski, Vermont
Mia Reynolds fell in love with baking as a teenager experimenting in her family kitchen. Her passion took her to New England Culinary Institute, where she learned practical pastry techniques, and later to Community College of Vermont to deepen her understanding of food management.
Mia combines clear, simple baking instructions with heartwarming stories, making home baking approachable for everyone.