Sizzling corn tortillas dance with vibrant salsa roja in this authentic chilaquiles recipe that brings the heart of Mexican street food right to your kitchen.
The rustic charm of this dish captures the essence of comfort and tradition.
Rich, tangy flavors meld together in a symphony of textures that awaken every taste bud.
Crispy tortilla chips soak up the robust sauce, creating a mouthwatering blend of softness and crunch.
Each bite tells a story of culinary heritage passed down through generations.
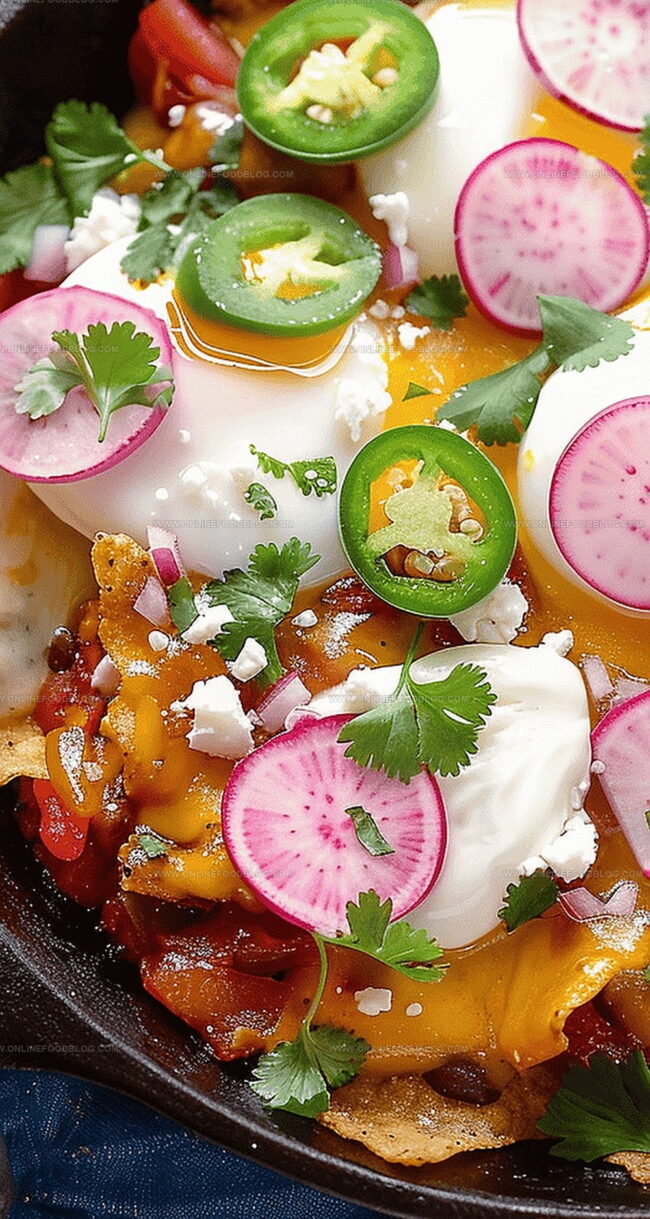
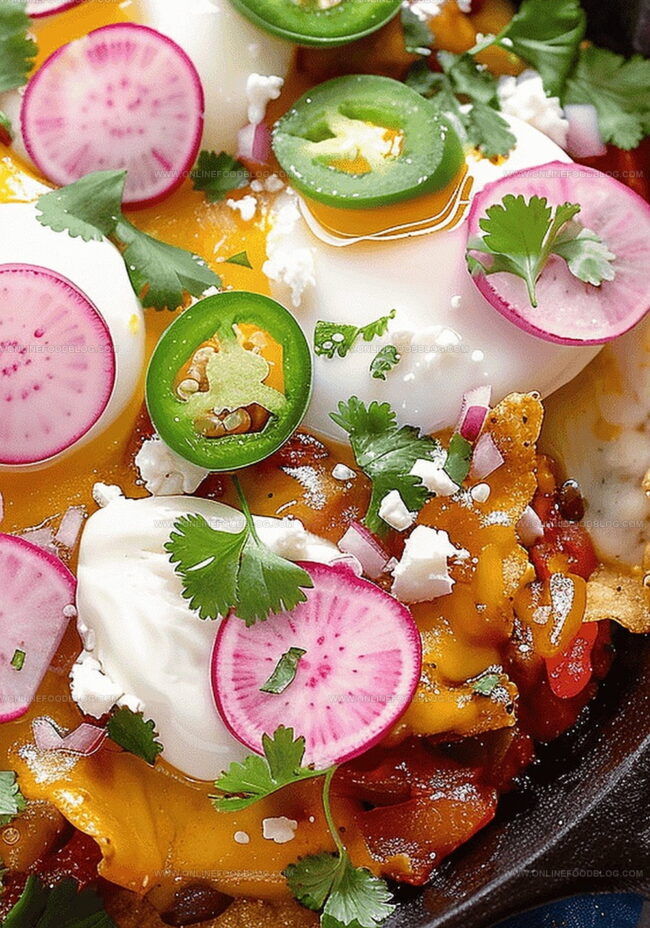
Topped with a perfect sunny-side-up egg and a sprinkle of fresh cilantro, this dish promises a breakfast experience that transports you to the bustling streets of Mexico.
Get ready to savor a plate that’s pure, unapologetic deliciousness.
Quick Recipe Overview
Prep Time: 15 minutes
Cook Time: 30 minutes
Total Time: 45 minutes
Calories: 350 kcal
Servings: 3
Chilaquiles Start Here: Ingredients You’ll Need
For Sauce Base:
Onion: Adds depth and sweetness to the sauce’s flavor profile, choose firm and glossy bulbs with no soft spots.
Peppers: Provide smoky undertones and slight heat, select vibrant, unblemished peppers with smooth skin.
Garlic: Delivers robust aromatics, pick plump cloves without green sprouts or soft areas.
Canned Tomatoes: Creates rich, tangy foundation for sauce, opt for high-quality whole peeled tomatoes.
For Base Layer:
Tortilla Chips: Provides crispy texture and traditional Mexican foundation, select thick, sturdy chips that won’t get soggy.
Shredded Cheese: Melts beautifully for creamy consistency, choose mild varieties like Monterey Jack.
Eggs: Creates soft, creamy protein layer, use fresh, room-temperature eggs for best scrambling.
Butter: Ensures smooth egg cooking and adds richness, select unsalted for better flavor control.
Jalapeño: Introduces sharp, spicy kick, choose bright green peppers with firm texture.
Radish: Offers crisp, peppery crunch, pick bright, firm radishes with fresh green tops.
Cilantro: Provides fresh, herbal brightness, select vibrant green leaves without wilting.
Sour Cream: Adds cool, tangy contrast, choose full-fat version for creamiest texture.
Prep Tools for Authentic Chilaquiles at Home
Blender: Essential for creating smooth, silky sauce from roasted vegetables and tomatoes.
Baking sheet: Crucial for broiling onions, peppers, and garlic to develop deep, rich flavors.
Cast-iron skillet or oven-safe pan: Perfect for layering chips and baking chilaquiles to crispy perfection.
Nonstick skillet: Ideal for preparing soft, fluffy scrambled eggs without sticking.
Aluminum foil: Helps with easy cleanup and prevents burning during broiling.
Spatula: Necessary for scraping and flipping eggs during cooking.
Whisk: Great for beating eggs until they’re smooth and uniform.
Cooking spray or oil brush: Helps prevent ingredients from sticking to pans.
Saucepan: Used for simmering and reducing the sauce to concentrate flavors.
Steps to Sizzle, Simmer, and Serve Chilaquiles
Broiled Salsa Foundation
Vegetable Roasting Preparation The first step involves setting up your broiler and preparing a baking sheet with a light oil coating. Spread onions, peppers, and garlic across the surface in an even layer.
Salsa Creation After broiling vegetables until they soften and develop slight char marks, transfer them into a blender. Add tomatoes and pulse until smooth, creating a vibrant sauce base.
Sauce Simmering Pour the blended mixture into a saucepan. Let it gently bubble on medium heat, stirring occasionally to develop deep flavor profiles. Season with salt and pepper to enhance taste.
Tortilla Layer Assembly Select an oven-safe skillet and create strategic layers of tortilla chips. Drizzle homemade salsa between chip layers, generously sprinkling different cheese varieties.
Cheese Melting Bake the layered chilaquiles until cheese becomes golden and bubbly, creating a crispy, melted texture.
Egg Preparation Whisk eggs in a separate pan, cooking them softly and scrambling with gentle movements to maintain a creamy consistency.
Final Garnish Top the baked chilaquiles with scrambled eggs, fresh jalapeño slices, radish slivers, cilantro sprigs, and a luxurious sour cream dollop. Serve immediately for maximum flavor and texture.
Ways to Personalize Your Chilaquiles Bowl
Rotate baking sheet every few minutes during broiling to ensure even charring and prevent burning. Keep a close eye on vegetables to achieve that smoky, blistered exterior without turning them into charcoal.
Control heat levels by removing pepper seeds or adding extra jalapeños. Experiment with different chile varieties like poblano or ancho for unique flavor profiles that match your spice tolerance.
Prepare salsa and tortilla layers in advance, storing separately in refrigerator. When ready to serve, quickly assemble and bake for a stress-free meal that tastes freshly made.
Swap scrambled eggs with shredded chicken, carnitas, or chorizo for a heartier breakfast or brunch dish. Vegetarians can substitute with black beans or scrambled tofu for additional protein boost.
Mix different cheese types like Monterey Jack, queso fresco, or pepper jack to create a more complex and rich melting layer. Grate cheeses fresh for maximum melting potential and enhanced flavor complexity.
Serving Chilaquiles for Breakfast or Brunch
Fiesta Brunch Delight: Transform your chilaquiles into a festive weekend brunch centerpiece that will wow your friends and family.
Mexican Morning Bliss: Pair this dish with fresh-squeezed orange juice, strong Mexican coffee, or a zesty bloody maria for a complete morning experience.
Crowd-Pleasing Comfort: Serve family-style directly in the skillet, allowing everyone to dig in and enjoy the crispy, cheesy layers with their own toppings of choice.
Flavor Customization Station: Set out extra toppings like diced avocado, hot sauce, extra cotija cheese, and chopped green onions so guests can personalize their plate and create their perfect bite.
Smart Ways to Store and Reheat Chilaquiles
Smart Storage Solutions
Refrigerator Refresh: Store leftover chilaquiles in an airtight container for up to 2 days. Separate the crispy tortilla chips from the sauce to maintain their crunchiness and prevent sogginess.
Flavor Revival Trick: When reheating, use a skillet instead of a microwave to restore the chips’ original texture. Add a splash of fresh salsa or sauce to revive moisture and enhance taste.
Ingredient Separation Strategy: Keep prepared components like salsa, cheese, and chopped garnishes in separate sealed containers. This method allows quick assembly and maintains individual ingredient quality for 3-4 days.
Freezer Friendly Hack: Freeze homemade salsa base in small portions for future chilaquiles. Wrap tightly in freezer-safe containers or bags, which remain delicious for up to one month when properly sealed.
Mexican chilaquiles showcase tortilla chips simmered in zesty salsa, topped with crema, queso fresco, and optional eggs or shredded chicken. Rich regional flavors make this classic breakfast dish a comforting culinary journey you’ll savor from first bite to last.
Ingredients
Scale
½ bag tortilla chips
4 large eggs
½ cup (118 ml) shredded Mexican blend cheese
2 tablespoons (30 ml) crumbled cotija or queso fresco cheese
12–16 pickled jalapeño slices
1 tablespoon (15 ml) butter
1 watermelon radish, thinly sliced
fresh cilantro leaves
sour cream
Instructions
Roasting Aromatics: Position oven rack near broiler and line baking sheet with foil. Char onions, peppers, and garlic until softened and slightly blistered, removing peppers if cooking faster than other vegetables.
Creating Sauce Base: Transfer roasted vegetables to blender with canned tomatoes, puréeing until smooth. For textural variation, reserve some tomatoes to incorporate after initial blending. Simmer sauce in saucepan over medium heat for 10 minutes, stirring to prevent splattering and seasoning with salt and pepper.
Assembling Chilaquiles: Lightly oil an oven-safe skillet and construct layered composition with tortilla chips, prepared sauce, shredded cheese, and cotija, ensuring even distribution of ingredients.
Baking Process: Place skillet in preheated 400°F oven, allowing cheese to melt and become effervescently bubbly, approximately 5-10 minutes.
Egg Preparation: While chilaquiles bake, whisk eggs in nonstick skillet with melted butter. Cook eggs using continuous scraping and flipping technique, breaking larger pieces until achieving soft, uniform consistency.
Final Presentation: Remove chilaquiles from oven and garnish with scrambled eggs, sliced jalapeños, radish rounds, and fresh cilantro. Crown with central dollop of sour cream and serve immediately to maintain crisp texture and optimal temperature.
Notes
Broiler Technique: Carefully monitor vegetables to prevent burning, rotating or removing items that cook faster for even charring.
Sauce Consistency Control: Adjust blending method for desired texture – fully purée for smooth sauce or reserve chunks for rustic feel.
Cheese Layer Strategy: Create alternating layers to ensure even distribution and maximum flavor in every bite.
Egg Perfection Tip: Cook eggs slowly and gently, removing from heat when just set to maintain creamy, soft texture.
Degree: Certificate in Food and Beverage Management
Focus: Essential knowledge of recipe development, ingredient sourcing, and food business basics.
Mia Reynolds fell in love with baking as a teenager experimenting in her family kitchen. Her passion took her to New England Culinary Institute, where she learned practical pastry techniques, and later to Community College of Vermont to deepen her understanding of food management.
Mia combines clear, simple baking instructions with heartwarming stories, making home baking approachable for everyone.


Mia Reynolds
Food Writer & Home Cooking Specialist
Expertise
Easy Home Baking, Recipe Writing and Storytelling, Local and Seasonal Ingredients, Baking for Beginners
Education
New England Culinary Institute (NECI), Montpelier, Vermont
Community College of Vermont, Winooski, Vermont
Mia Reynolds fell in love with baking as a teenager experimenting in her family kitchen. Her passion took her to New England Culinary Institute, where she learned practical pastry techniques, and later to Community College of Vermont to deepen her understanding of food management.
Mia combines clear, simple baking instructions with heartwarming stories, making home baking approachable for everyone.