
Homemade Buster Bar Ice Cream Cake Recipe: A Simple Summer Joy
Buster bar ice cream cakes bring pure nostalgia and sweet satisfaction to any gathering.
Summer celebrations call for this delightful frozen dessert that merges classic flavors into one incredible treat.
Cool layers of creamy textures create an irresistible combination that makes everyone smile.
Chocolate and vanilla dance together in a delectable harmony that promises pure indulgence.
Rich ingredients blend seamlessly, refineing simple components into something extraordinary and memorable.
Fans of frozen desserts will appreciate the sophisticated yet approachable nature of this classic cake.
Home bakers can easily craft this impressive dessert with minimal culinary expertise.
Prepare to wow friends and family with a show-stopping dessert that guarantees delighted reactions.
Buster Bar Ice Cream Cake: What’s the Hype?
Everything You Need for Buster Bar Ice Cream Cake
Ice Cream and Base:Topping and Flavor Enhancers:Finishing Component:Making Buster Bar Ice Cream Cake at Home
Step 1: Prep the Creamy Canvas
Let vanilla ice cream sit at room temperature for a few minutes to soften slightly. Grab a 9×13 inch baking dish and line the bottom completely with chocolate graham crackers, cutting some crackers in half to fill any gaps.
Step 2: Spread the First Ice Cream Layer
Gently scoop half of the softened vanilla ice cream over the graham cracker base. Use a stiff spatula to create a smooth, even layer that covers the entire surface.
Step 3: Drizzle with Decadent Fudge
Pour hot fudge sauce evenly across the ice cream layer. Use a spatula to spread the sauce, ensuring complete coverage. Sprinkle the following ingredients over the fudge:Step 4: Add the Final Ice Cream Layer
Carefully spread the remaining vanilla ice cream over the fudge and peanuts. Press down gently to create a smooth, flat surface.
Step 5: Finish with Crunchy Topping
Scatter the remaining red skin peanuts across the top of the ice cream. Drizzle Magic Shell chocolate coating over the entire surface to create a delightful, crunchy seal.
Step 6: Freeze and Serve
Place the baking dish in the freezer for at least 3 hours to allow the cake to set completely. When ready to serve, slice into bars and enjoy your homemade Buster Bar Ice Cream Cake.
Ice Cream Cake Tips: Buster Bar Edition
Store and Reheat Buster Bar Ice Cream Cake
What Pairs Well with Buster Bar Ice Cream Cake
Buster Bar Ice Cream Cake Remix Ideas
Print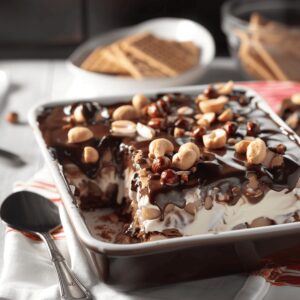
Buster Bar Ice Cream Cake Recipe
- Total Time: 15 minutes
- Yield: 12 1x
Description
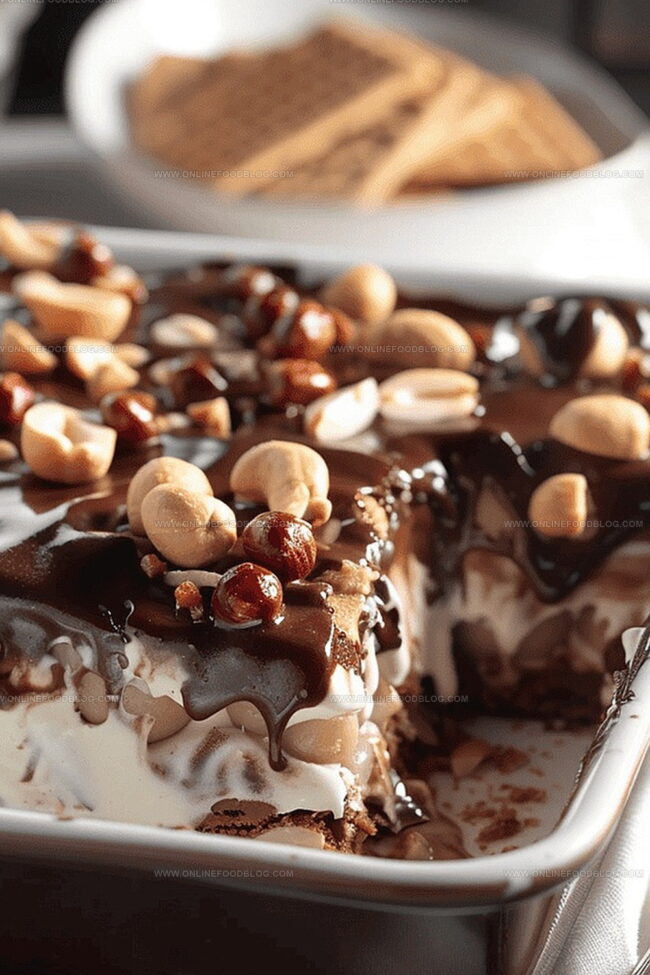
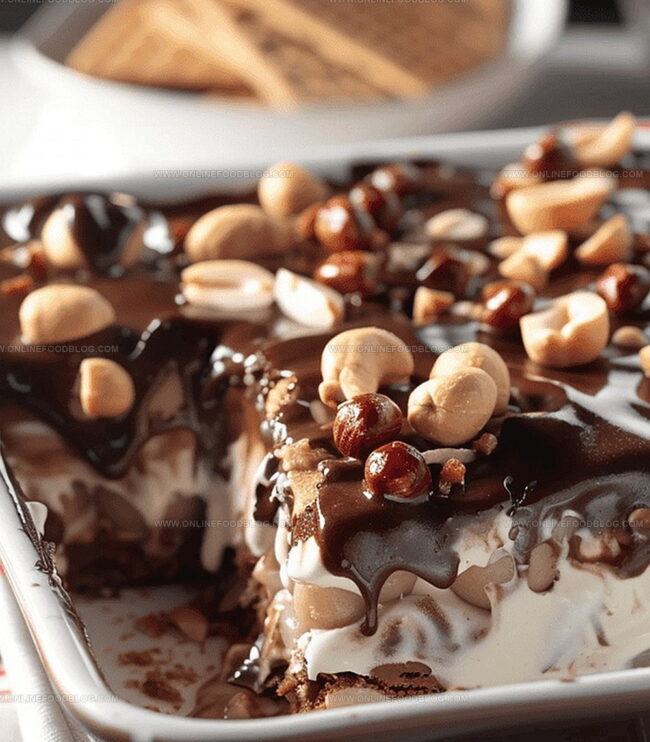
Buster Bar Ice Cream Cake delivers a nostalgic chocolate and peanut butter paradise straight from Dairy Queen’s classic treat. Cool layers of vanilla ice cream, rich chocolate fudge, and crunchy peanuts create an irresistible dessert that will delight you with its simple yet indulgent charm.
Ingredients
Main Ingredients:
- 1 gallon vanilla ice cream
- 10 whole chocolate graham crackers
- 1 ½ cups red skin peanuts
Sauce and Coating:
- 14 ounces hot fudge sauce
- 7.5 ounces Magic Shell chocolate coating
Instructions
- Gently remove vanilla ice cream from the freezer and let it soften at room temperature for 10-15 minutes until spreadable.
- Prepare a 9×13 inch (23×33 centimeters) baking dish by lining the bottom completely with chocolate graham crackers, strategically breaking some crackers to ensure full coverage without gaps.
- Using a sturdy spatula, carefully spread half of the softened vanilla ice cream over the graham cracker base, creating a smooth, even layer approximately 1/2 inch (1.25 centimeters) thick.
- Pour warm hot fudge sauce evenly across the ice cream surface, using the back of a spoon to distribute the sauce completely and create a uniform chocolate layer.
- Generously sprinkle roughly half of the roasted red skin peanuts across the fudge sauce, ensuring balanced nut coverage.
- Delicately add the remaining softened vanilla ice cream on top of the fudge and peanut layer, gently pressing down to create a level surface.
- Distribute the remaining peanuts across the top layer of ice cream, then liberally drizzle Magic Shell chocolate coating over the entire dessert to bind the nuts and create a glossy finish.
- Transfer the baking dish to the freezer and allow the ice cream cake to set completely for a minimum of 3 hours or overnight for optimal firmness.
- Before serving, remove from freezer and slice into individual rectangular bars using a sharp knife warmed under hot water for clean cuts.
Notes
- Soften vanilla ice cream beforehand to ensure smooth spreading and easy layering.
- Use chocolate graham crackers as a sturdy, flavorful base that complements the dessert’s rich chocolate profile.
- Hot fudge sauce creates a decadent middle layer that adds intense chocolate flavor and moisture to the cake.
- Red skin peanuts provide a delightful crunch and salty contrast against the sweet ice cream and chocolate.
- Magic Shell chocolate coating acts as a delicious “glue” that secures toppings and creates a crisp chocolate shell.
- Freezing for at least 3 hours allows layers to set completely, ensuring clean slices and optimal texture when serving.
- Prep Time: 15 minutes
- Cook Time: 0 minutes
- Category: Desserts, Snacks
- Method: None
- Cuisine: American
Nutrition
- Serving Size: 12
- Calories: 430 kcal
- Sugar: 35 g
- Sodium: 220 mg
- Fat: 25 g
- Saturated Fat: 12 g
- Unsaturated Fat: 10 g
- Trans Fat: 0.5 g
- Carbohydrates: 45 g
- Fiber: 2 g
- Protein: 8 g
- Cholesterol: 55 mg
Lucas Bennett
Founder & Recipe Creator
Expertise
Simple Everyday Recipes, Sustainable Cooking Practices, Creative Meal Planning, Recipe Testing and Improvement
Education
Fox Valley Technical College, Appleton, Wisconsin
Lake Superior College, Duluth, Minnesota
Lucas Bennett’s cooking journey started in his parents’ kitchen, where he learned to prepare tasty, no-fuss meals from scratch. His culinary passion led him to Fox Valley Technical College, where he gained practical cooking skills.
He then expanded his focus on sustainability at Lake Superior College. Today, Lucas shares easy, approachable recipes designed to make cooking enjoyable and stress-free for everyone.